
RESTful Web Services with Jersey
Although Eclipse is commonly used for Java web service programming, it can be challenging to configure and use for testing. Luckily Eclipse is not the only IDE game in town.
NetBeans provides a rich environment for developing Java web services with Jersey – the reference implementation of JAX-RS RESTful web services. This article will explain how to create a simple RESTful service and test it with the Apache Tomcat Server from the NetBeans IDE.
Install NetBeans and Tomcat
NetBeans
If you don’t have it already, download the J2EE versions of NetBeans, which includes GlassFish and Tomcat web servers. I’ll use Tomcat in this blog.
- Open the install then when you get to the Installation Type screen, click on the Customize button.
- Select the Apache Tomcat package and deselect the GlassFish Server package.x2
- Click Install to finish.
Configure Tomcat
Now we need to configure Tomcat to be able to run and deploy web services. To run web services we need a Tomcat user with manager-script privileges. The easiest way to do that is let NetBeans do that for us by deleting the Tomcat server when NetBEans is installed, then adding it back in (bizarre as that may seem).
- Run NetBeans.
- When NetBeans comes up, Right click on the Servers > Apache Tomcat or TomEE in the Services tab.
- Select the Apache Tomcat or TomEE server.
- Click on the Remove Server button.
- Click on the Add Server.. button. I told you this is bizarre.
- Select Apache Tomcat or TomEE from the list of servers in the Choose Server box.
- Set the server Name to
Apache Tomcat. - Click on Next.
- In the Add Server Instance panel, click on Browse to find your Tomcat server directory. For the macOS, that is /Applications/NetBeans/apache-tomcat-8.0.27. Your version of Tomcat and the location maybe different in your case.
- Select the Tomcat directory and click on Open.
- For both Username and Password enter
tomcatto make things simple. For production systems you’ll want a better password than that. - Set the Server Port to
8080for this example. Like the Username and Password you can set to whatever you like in the ong run. - Make sure the Create user if it does not exist box is checked.
- Click the Finish button.
- Back in the Servers panel click the Close button.
- Open up $CATALINA_HOME/conf/tomcat-users.xml file.
$CATALINA_HOMEis the directory where you installed Tomcat. - Add
manager-guito the list of roles for thetomcatuser.
Test NetBeans-Tomcat Integration
It’s a good idea to test whether Tomcat can now be started within NetBeans.
- Right click Servers > Apache Tomcat > Start in the NetBeans Services tab.
- Open http://localhost:8080 in a browser. That action should open the main Apache Tomcat screen.
- Click on the Manager App button
- Then enter
tomcatfor the user name and password. That action should open the Tomcat Web Application Manager screen, an example of which is shown below: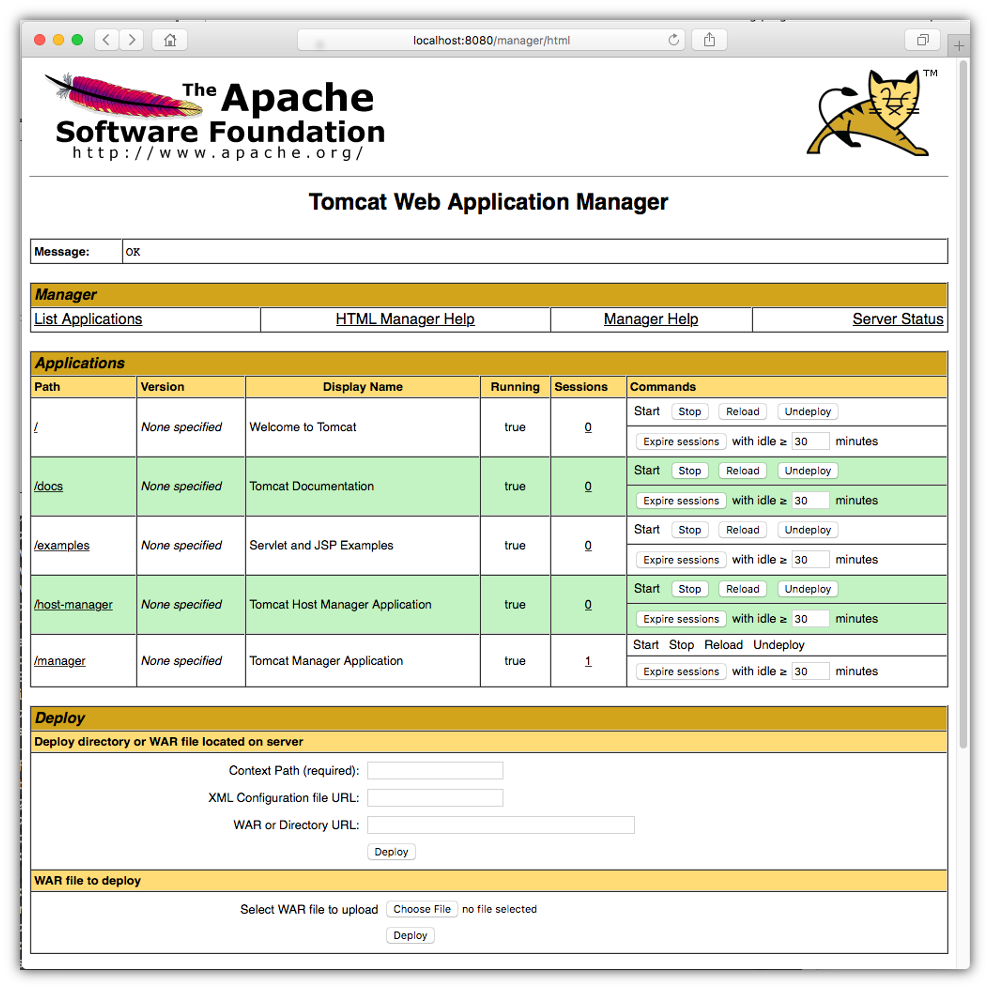
Note that the Deploy section of this screen provides the tools we need to deploy our web service to Tomcat.
Create RESTful Web Services
Create a Web Application Project
After configuring the development environment, you first need to build a base web application to which you will add a RESTful services class and methods later.
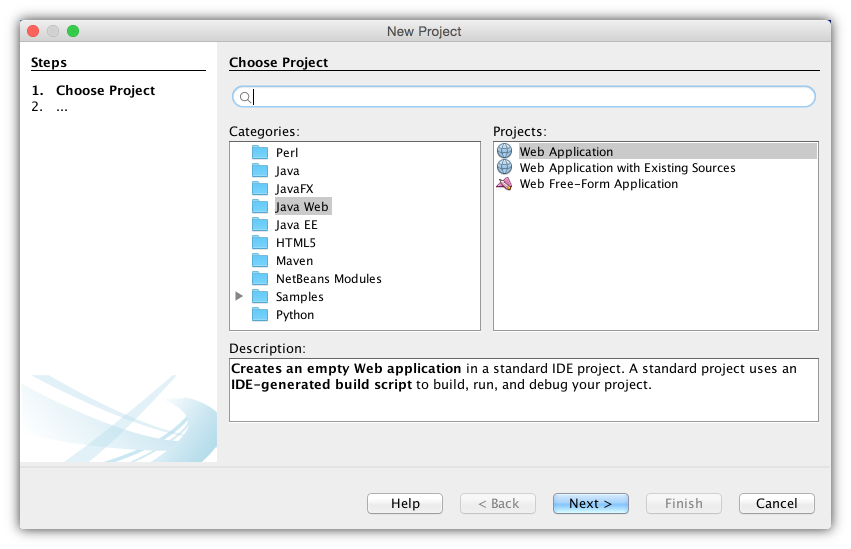
- Select File > Open > New Project…
- Select the Java Web category and Web Application project, then click Next.
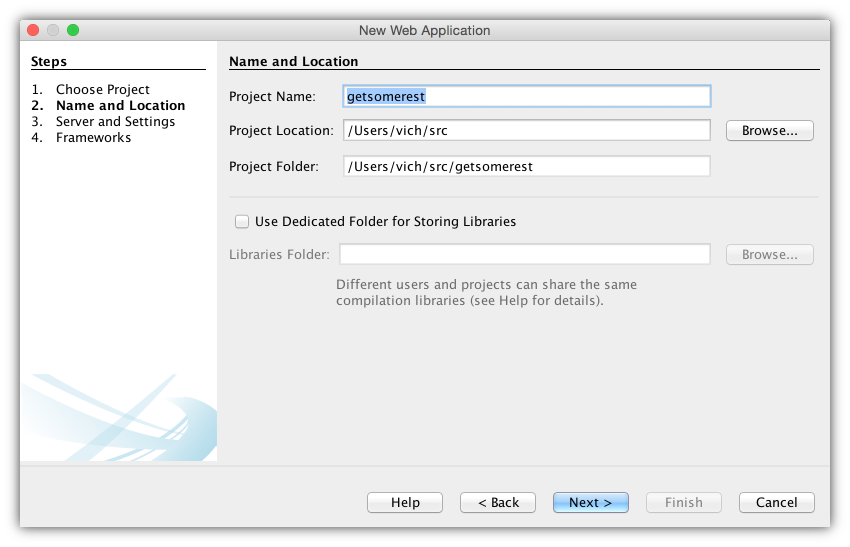
- Enter the project name as getsomerest.
- Set the directory location of the project, then click Next. This action sets the top level REST path variable in the context.xml file.
- In the Server and Settings screen, select Apache Tomcat in the Server field, then click Next.
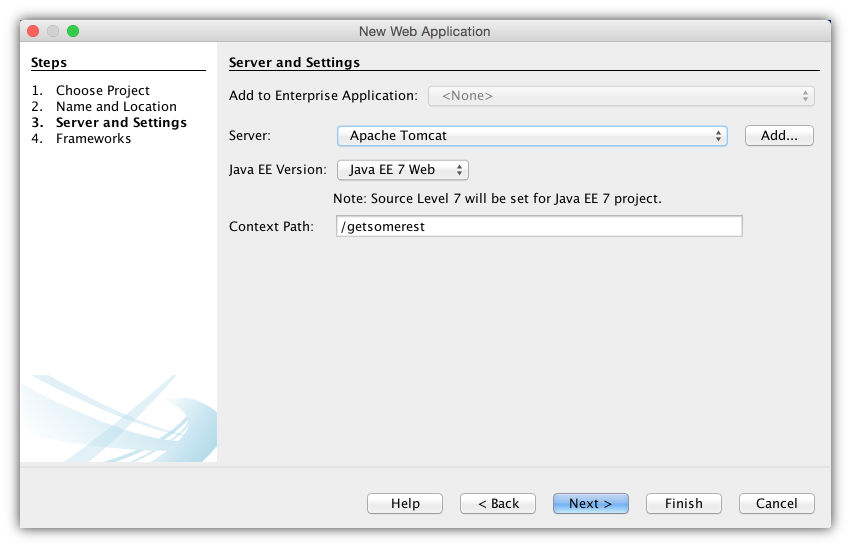
- We will not add any additional application frameworks, so click Finish in the Frameworks screen (not shown).
You now have a simple web application that will load the index.html page. To run the application, click on the green triangle under the NetBeans menu bar, select Run > Project from the menu bar or press F6.
GET Service Handler
Now that we have a basic web application, we will add a RESTful service that responds to an HTTP GET request.
- Right click on getsomerest in the Projects tab.
- Select New… then select RESTful Web Services from Patterns…
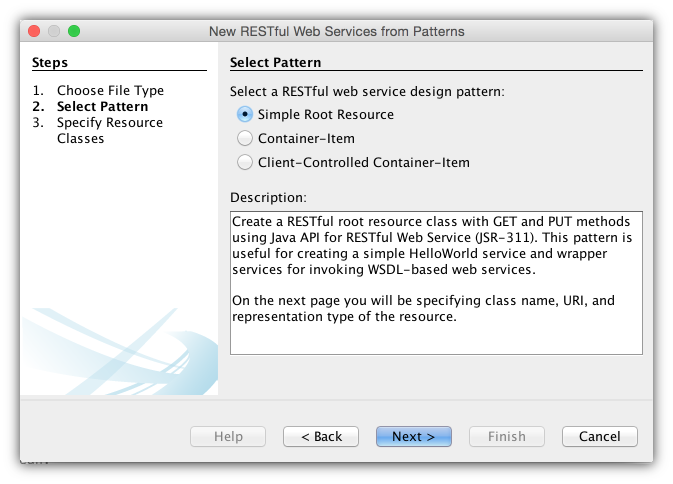
- Select the Simple Root Resource in the Select Pattern screen.
- Then click Next.
- In the Specify Resource screen set the name of the Java package that will contain your service class. The name can be anything, but it is usually a domain name in reverse order. In this example we’ll use com.example.
- Set the service Path to
serviceand the service Class Name toServiceResource. - Set the MIME type for the GET service to
text/htmlfor the simple GET service then click on Finish.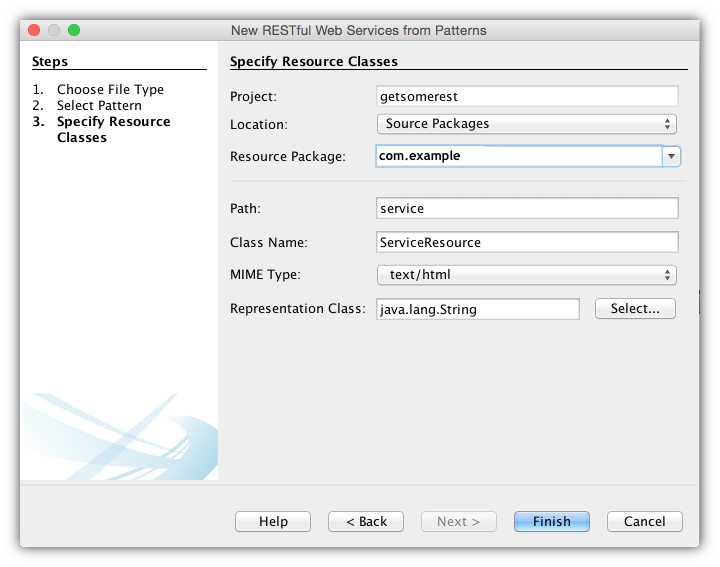
- You will now see a section in your project called RESTful Web Services. If you open this section you can see the service class with GET and PUT handler methods that have been created. Replace the contents of the
getHtml()with thereturnstatement as shown below. Note that the content type of the return string is specified by the@Produces(“text/html”)Jersey annotation.
package com.example;

import javax.ws.rs.core.Context;
import javax.ws.rs.core.UriInfo;
import javax.ws.rs.PathParam;
import javax.ws.rs.Consumes;
import javax.ws.rs.PUT;
import javax.ws.rs.Path;
import javax.ws.rs.GET;
import javax.ws.rs.Produces;

@Path("service")
public class ServiceResource {

    @Context
    private UriInfo context;

    public ServiceResource() {
    }

    @GET
    @Produces("text/html")
    public String getHtml() {
        return "<h1>Get some REST!</h1>";
    }

    @PUT
    @Consumes("text/html")
    public void putHtml(String content) {
    }
}
Next we need to set the path to the web service so it will be automatically invoked when we test it with the default browser.
- In the Projects tab right click on the getsomerest project then select Properties.
- In the Categories section select Run.
- When we test the web service the URL to the GET service will be
http://localhost:8080/getsomerest/webresources/service. Recall that thegetsomerestpart of the URL is defined in the path attribute in the context.xml file which you can find in the configuration files of the project. Thewebresourcespart of the path is set in the@javax.ws.rs.ApplicationPath("webresources")annotation in the ApplicationConfig.java file that NetBeans created. Theservicepart is defined by the@Pathannotation in the ServiceResource.java file. Enter/webresources/servicein the Relative URL field then click OK.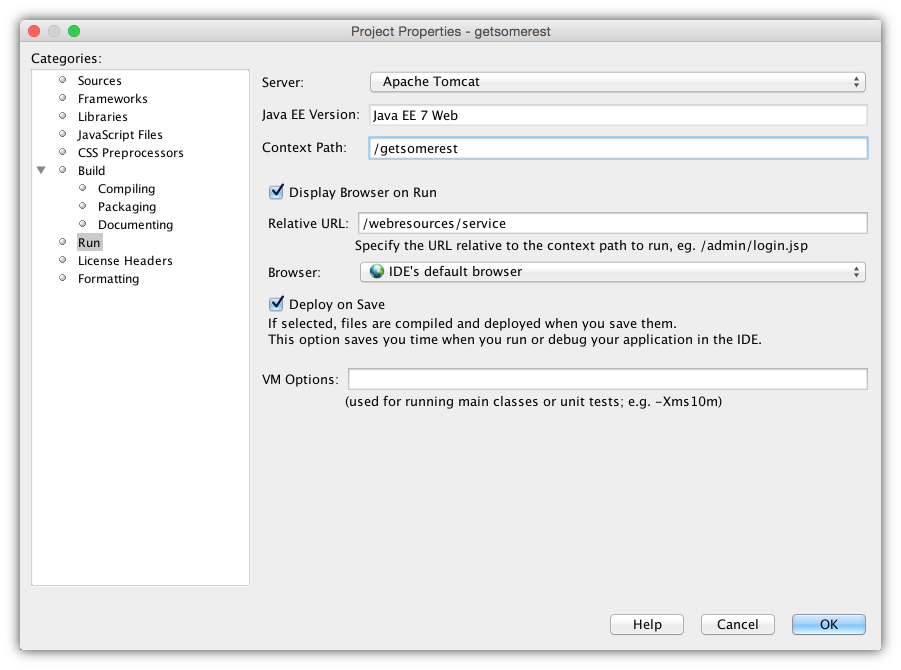
POST Service Handler
Most web services have a POST handler so let’s add one now. The handler will accept urlencoded text from a REST client which is specified with the @Consumes(“application/x-www-form-urlencoded”) Jersey annotation. In this case the POST handler will simply return the decoded plain text to the client which is specified with the @Produces(“text/plain”) Jersey annotation.
Add the following import statement to the list of imports.
import javax.ws.rs.POST;Add the following code to the ServiceResource class.
@POST
@Consumes("application/x-www-form-urlencoded")
@Produces("text/plain")
public String postHandler(String content) {
    return content;
}
The @Consumes annotation specifies that the POST handler accepts requests containing URL encoded data. The Content-Type of the POST request much match the @Consumes type or else the POST handler will not get called. The @Produces annotation specifies that the POST handler will return ordinary text.
If your server is still running from previous testing, NetBeans will automatically deploy the service in your test environment and restart Tomcat. Otherwise run the project again. You can test the web service by sending it a file from your system with the curl command as follows.
$ curl http://localhost:8080/getsomerest/webresources/service --data "Hello World!"The POST handler should return Hello World!.
Web Service Deployment
Now that you have a working RESTful web service with GET and POST handlers, you’ll want to deploy the service to your target Tomcat server. NetBeans packages all the web service code into a WAR package. In the case of this project the package will be called GetSomeRest.war. You can deploy this package to the target Tomcat server as follows:
- Open the Tomcat main page in your browser. Use the Username, Password, and Server Port you entered when you set up the Tomcat server. The host will be
localhostsince the testing is done with the syste where NetBeasn is installed. - Click on the Manager button using the credentials you set in tomcat-users.xml earlier.
- Scroll down to the WAR file to deploy.
- Click on the Choose file button.
- Navigate to your NetBeansProjects/GetSomeRest/dist directory and select GetSomeRest.war.
- Click on Deploy. In the Path column under Applications you should see
/getromerest. - Run the curl command from the previous section with the host/IP and port for your target Tomcat to make sure the service is working.
Jersey Web Service Annotations
Jersey provides a set of Java annotations that can be used to define the web service structure. So far we have already used these annotations in the example GET service:
@Path– Defines the URL relative path to the given resource. We saw in the previous section that the complete URL to our service was defined by fields in the context.xml and web.xml files plus the@Pathfield. You can change the relative path of any service by modifying these three fields. For example if you wanted to simplify the GET service URL to behttp://localhost:8080/GetSomeRest/serviceyou would set theurl-patternfield in web.xml to/*.@Context– Defines parameters that can be extracted from the request.@GET– Identifes the method in the service class that will handle GET requests.@Produces– Specifies the MIME type of the response that is returned to the client.@Consumes– Specifies the content type that the service will accept as input.
Some other important annotations that you’ll want to know about include:
@PUT– Identifies the method that will handle PUT requests.@DELETE– Identifies the method that will handle DELETE requests.@Consumes– Specifies the MIME type that the method immediately following the annotation will accept from the client. It is possible to define multiple MIME types that will each be handled by a separate method. The GET service example does not have any arguments so the@Consumesannotation was not needed. If we wanted to add a string parameter to the GET service the code for thegetHTML()method would look something like this:
@GET
@Consumes("text/plain")
@Produces("text/html")
public String getHtml(String message) {
    return "<h1>The browser sent this message "+message+"</h1>";
}@QueryParam– Denotes a field that will be extracted from the URL in a GET request after the?character. Here is an example taken from the Jersey documentation website. For a URL request of this form:http://<server>:8080/<path>/smooth?step=<value>&min-m=<value>&.... The handler method would look like this:
@Path("smooth")
@GET
public Response smooth(
@DefaultValue("2") @QueryParam("step") int step,
@DefaultValue("true") @QueryParam("min-m") boolean hasMin,
@DefaultValue("true") @QueryParam("max-m") boolean hasMax,
@DefaultValue("true") @QueryParam("last-m") boolean hasLast,
@DefaultValue("blue") @QueryParam("min-color") ColorParam minColor,
@DefaultValue("green") @QueryParam("max-color") ColorParam maxColor,
@DefaultValue("red") @QueryParam("last-color") ColorParam lastColor
) { ... }@DefaultValue– Denotes the value that will be used to fill a variable in a@QueryParamlist that is missing.@PathParam– Denotes a field that will be extracted from a field in the URL path. Here is an example taken from the Jersey documentation website:
@GET
@Path("/images/{image}")
@Produces("image/*")
public Response getImage(@PathParam("image") String image) {
  if (!isSafeToOpenFile(image)) {
    throw new IllegalArgumentException("Cannot open the image file.");
  }

  File f = new File(image);

  if (!f.exists()) {
    throw new WebApplicationException(404);
  }

  String mt = new MimetypesFileTypeMap().getContentType(f);
  return Response.ok(f, mt).build();
}
Test RESTful Web Services
You can get the source code for the GetSomeRest project from GitHub – https://github.com/vichargrave/getsomerest. The master branch contains the project described in this blog. Open the project in Netbeans and run it with Tomcat according to the directions in this blog.
Additional Information
The intent of this blog is to get you started with RESTful web services in NetBeans. To keep things simple I’ve left out some important aspects of web service development not the least of which includes processing POST and PUT request bodies. For more information on writing more complex RESTful web services you can check out these resources:


Leave a comment