
Creating Elasticsearch Snapshots
Benjamin Franklin once wrote “…in this world nothing can be said to be certain, except death and taxes”. In this computerized world of ours, I would add having to backup your data to free up disk space to that list of eventualities.
For Elasticsearch users, backups are done using the Elasticsearch snapshot facility. In this article I’ll go through the design of an Elasticsearch backup system that you can use to create snapshots of your cluster’s indices and documents.
Elasticsearch Snapshot Storage System
For Elasticsearch snapshots to work, you must first set up a shared storage node that is accessible to all the nodes in your cluster over the common network which connects all the systems. The shared storage node can be either another computer system with volumes that are mounted on each of the nodes or a network storage drive.
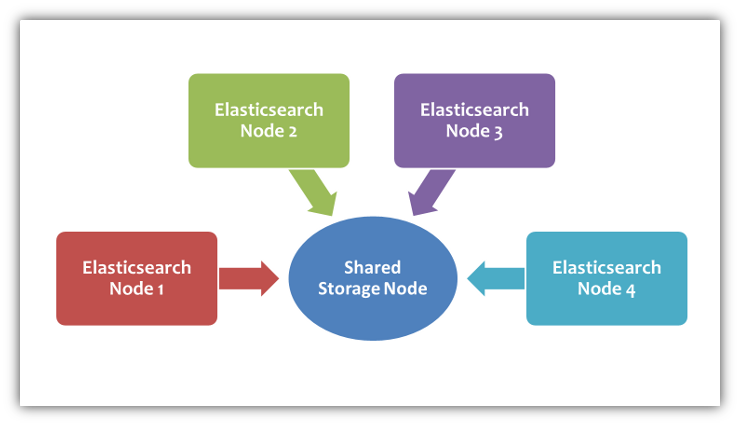
The system described in this article is the former variety, that uses an SMB file server to store the snapshots.
Configure Shared Storage Node
Setting up a SMB file server starts on the server side where you define the shared drives. Let’s assume that for the Elasticsearch cluster in this article there is one drive on the shared storage node that. Follow these steps to create a shared SMB drive:
- Add this stanza to /etc/smb.conf file identifying the shared drive:
[snaps] comment = Elasticsearch snapshot directory path = /data/snapshots public = yes writable = yes write list = +elasticsearchpath– location on the file server where snapshots will be stored.public– set to yes to make he drive visible on the networkwritable– set to yes to make the drive read/write.write list– user permitted to mount the drive, in this caseelasticsearchNote that the path and settings are just an example. You should tailor them to your system needs.
- If you want more than 1 shared drive, repeat step 1 for each drive.
- Create a system and SMB user named
elasticsearch:adduser elasticsearch mbpasswd -a elasticsearch -p
- Start the SMB file server:
 service smb start
 service nmb start
Configure Mount Points on the Cluster Nodes
At this point you have an SMB file server running on the shared storage node. Next let’s set up the mount points and mount the shared drive. Follow this procedure for each node in your Elasticsearch cluster.
- Create a mount drive in /media and set the ownership of it to
elasticsearch.mkdir /media/snaps chown elasticsearch:elasticsearch /media/snaps
- Add the following line to the /etc/fstab file to be able to mount the shared drive on the SMB file server:
//smb-server-ip/snaps /media/snaps cifs user,uid=UID,gid=GID,rw,exec,suid,auto,username=elasticsearch,password=PASSWORD 0 0
SMB server IP– IP address of the shared storage node.UID– user ID of theelasticsearchuser.GID– group ID of theelasticsearchuser.PASSWORD–elasticsearchSMB password set in step 3 of the previous section.
- With the entry you added to /etc/fstab, you can then mount the shared drive like this:
mount //smb-server-ip/snaps
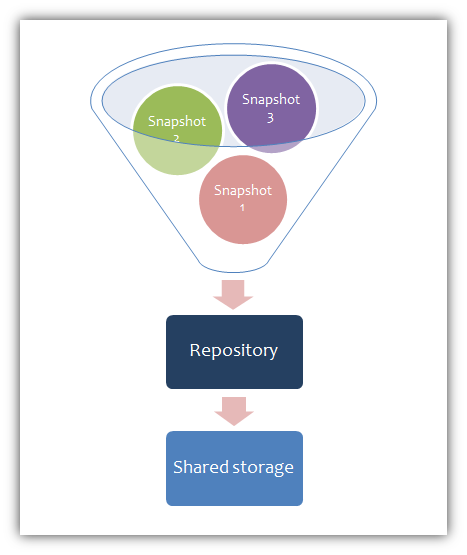
Repositories and Snapshots
Elasticsearch snapshots are organized into containers known as repositories. You can store 1 or more snapshots in any given repository. Each repository maps to a shared drive on the shared storage node.
Let’s say we are ingesting and indexing Twitter data – tweets – with our example Elasticsearch cluster. To create a repository called twitter_backup, run this command on one of the Elasticsearch nodes:
curl -XPUT 'localhost:9200/_snapshot/twitter_backup' -d '
{
      "type": "fs",
      "settings": {
          "location": "/media/snaps",
          "compress": "true"
      }
}'
The file type in this example is defined as fs meaning file system. There are also types for Hadoop HDFS (hdfs), Amazon S3 (s3) and others. The location is defined to be the shared storage mount point on the cluster node and the snapshot data is stored in compressed form.
As of Elasticsearch 1.7, you have to set the path.repo field in the elasticsearch.yml file to one or more paths where snapshots are to be stored. This is similar to the path.data field which is set to the path where Elasticsearch data files are stored. The SMB server is configured to store snapshots in /data/snapshots, the value of path in /etc/smb.conf, so the path.repo field should be set to the same path.
path.repo: /data/snapshotsNote you will have to restart Elasticsearch for this setting to take affect.
Create a Snapshot
When you create a snapshot, you can either include all or specific indices. Continuing with the example of ingesting tweet data, let’s say you are creating a new index every say and that the format of the index name is tweets-YYYY-MM-DD. If you want to snapshot the index created on 2014-11-01 in the twitter_backup repository run this command:
curl -XPUT 'localhost:9200/_snapshot/twitter_backup/tweets-2014-11-01?pretty&wait_for_completion' -d '
{
      "indices": "tweets-2014-11-01",
      "ignore_unavailable": "true",
      "include_global_state": "false"
   }
}'
The indices to include in the snapshot are passed as a JSON array in the indices field. Setting ignore_unavailable to true ensures that the command will not fail if 1 or more of the specified indices is missing. This is handy for situations where the command is run in a cronjob or some other automated way. Setting include_global_state to false prevents any of the cluster state information from being included in the snapshot which allows you to restore the snapshot to another cluster with different attributes.
The pretty directive formats the command output in human readable form instead of one big messy line.
The wait_for_completion directive tells the command to wait for the snapshot to complete before returning status information. This may not be desirable if you are snapshotting a lot of data. By omitting this directive the command will return immediately without waiting for the snapshot to finish.
To check the status of a snapshot command use this command specifying the repository and snapshot names:
curl -XGET 'localhost:9200/_snapshot/twitter_backup/2014-11-01?prettyThis command will indicate whether the given snapshot is in progress, finish and successful, or finished and failed.
Restore and Delete a Snapshot
Restoring the snapshot that you just made is simple with this command:
curl -XPOST 'localhost:9200/_snapshot/twitter_backup/2014-11-01/_restore?pretty'Since snapshot was created with the include_global_state set to false, the snapshotted indices can be restored to any cluster.
To delete a snapshot and the snapshot files on the shared storage drive use this command:
curl -XDELETE 'localhost:9200/_snapshot/twitter_backup/2014-11-01?pretty'Snapshot Management with Kopf
Kopf is an open-source Elasticsearch plugin that provides a browser console interface to manage your cluster. Here’s an example of the cluster management console. The color of the top menu bar reflects the health of the cluster: green, yellow or red. The status bar below the menu bar shows top-level cluster metrics: number of cluster nodes, number of indices, number of shares, number of unassigned shards, total number of documents and the amount of data in the cluster – primary plus replica shards.
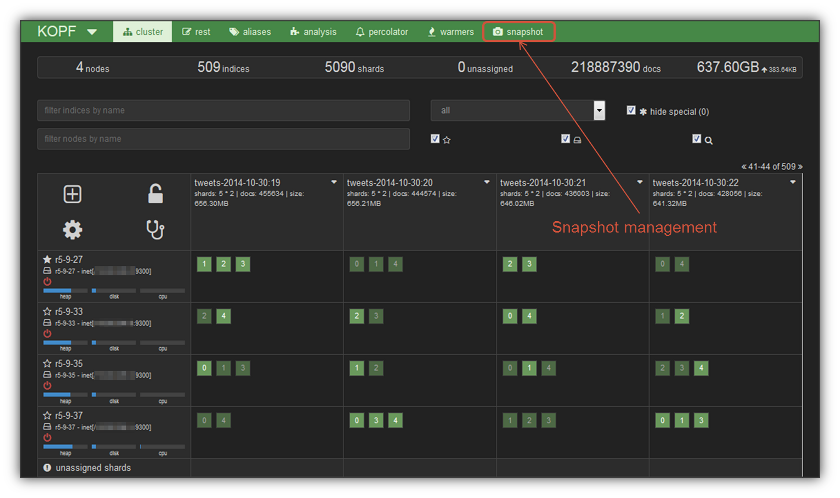
In this example there are 4 cluster nodes as shown in the left hand column. The cluster table shows the first four indices that I use to store tweets. The dark green squares in each node/index box are the primary shards and the lighter green squares are the replica shares. You can scroll though all the indices to see where the shards reside.
To create snapshots, you click on the snapshot item in the top menu bar which takes you to the snapshot management console shown below:
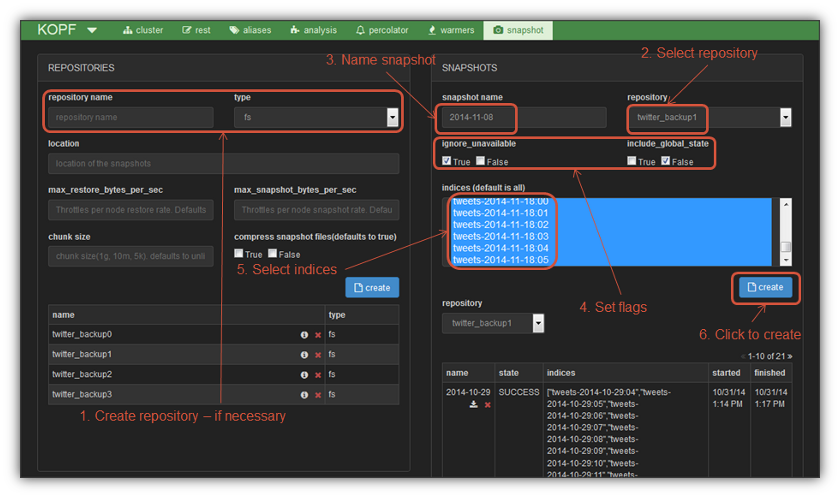
The steps to create a snapshot are shown in the diagram:
- Create repository, if necessary
- Select a repository to contain the snapshot
- Enter a name for the snapshot
- Set the snapshot flags
- Select the indices to be included in the snapshot
- Click the Create button to start the snapshot creation process
The Kopf console will return immediately with an indication of whether the snapshot was successfully initiated.


Leave a comment