Tweet Ingestion with NiFi and Elasticsarch
Apache NiFi is an open source data ingestion system that offers up a rich variety of components you can assemble to ingest, enrich, and store data. NiFi can grab data from any number of data sources, including logs and live streams. This article will exlplore the latter, ingesting tweets from the Twitter public feed and indexing them in Elasticsearch.
Install NiFi
You can get NiFi by building from source or just grabbing working binaries. I suggest using the binary version to get NiFi up and running as quickly as possible.
After downloading and unpacking the NiFi binary package, go to the NiFi directory and run bin/nifi.sh start. It will take a couple of minutes for NiFi to start. When is running open the NiFi console at http://localhost:8080/nifi in a browser. The default listening port 8080 can be changed by setting the nifi.web.http.port field in the conf/nifi.properties configuration file. You should get a blank console canvas that looks like this:

Install Elasticsearch
If you don’t already have Elasticsearch, you can install it on your local system with these commands:
mkdir elasticsearch-example
wget https://artifacts.elastic.co/downloads/elasticsearch/elasticsearch-7.1.0-linux-x86_64.tar.gz
tar -xzf elasticsearch-7.1.0.tar.gz
For the Mac use this wget command instead:
wget https://artifacts.elastic.co/downloads/elasticsearch/elasticsearch-7.1.0-linux-x86_64.tar.gzYou can run Elasticsearch from the command line like this:
./elasticsearch-7.1.0/bin/elasticsearchBy default, Elasticsearch listens for requests on port 9200.
Twitter Data Pipeline
NiFi data pipelines consist of one or more processors that are connected together to ingest, filter/enrich data, and output data to some sort of storage medium. At the very least there must be an ingestion processor that pipes sends data to an output processor. Filtering and enriching processors are optional, but more often than not you need these intermediate processors to clean and map the data you want to end up with.
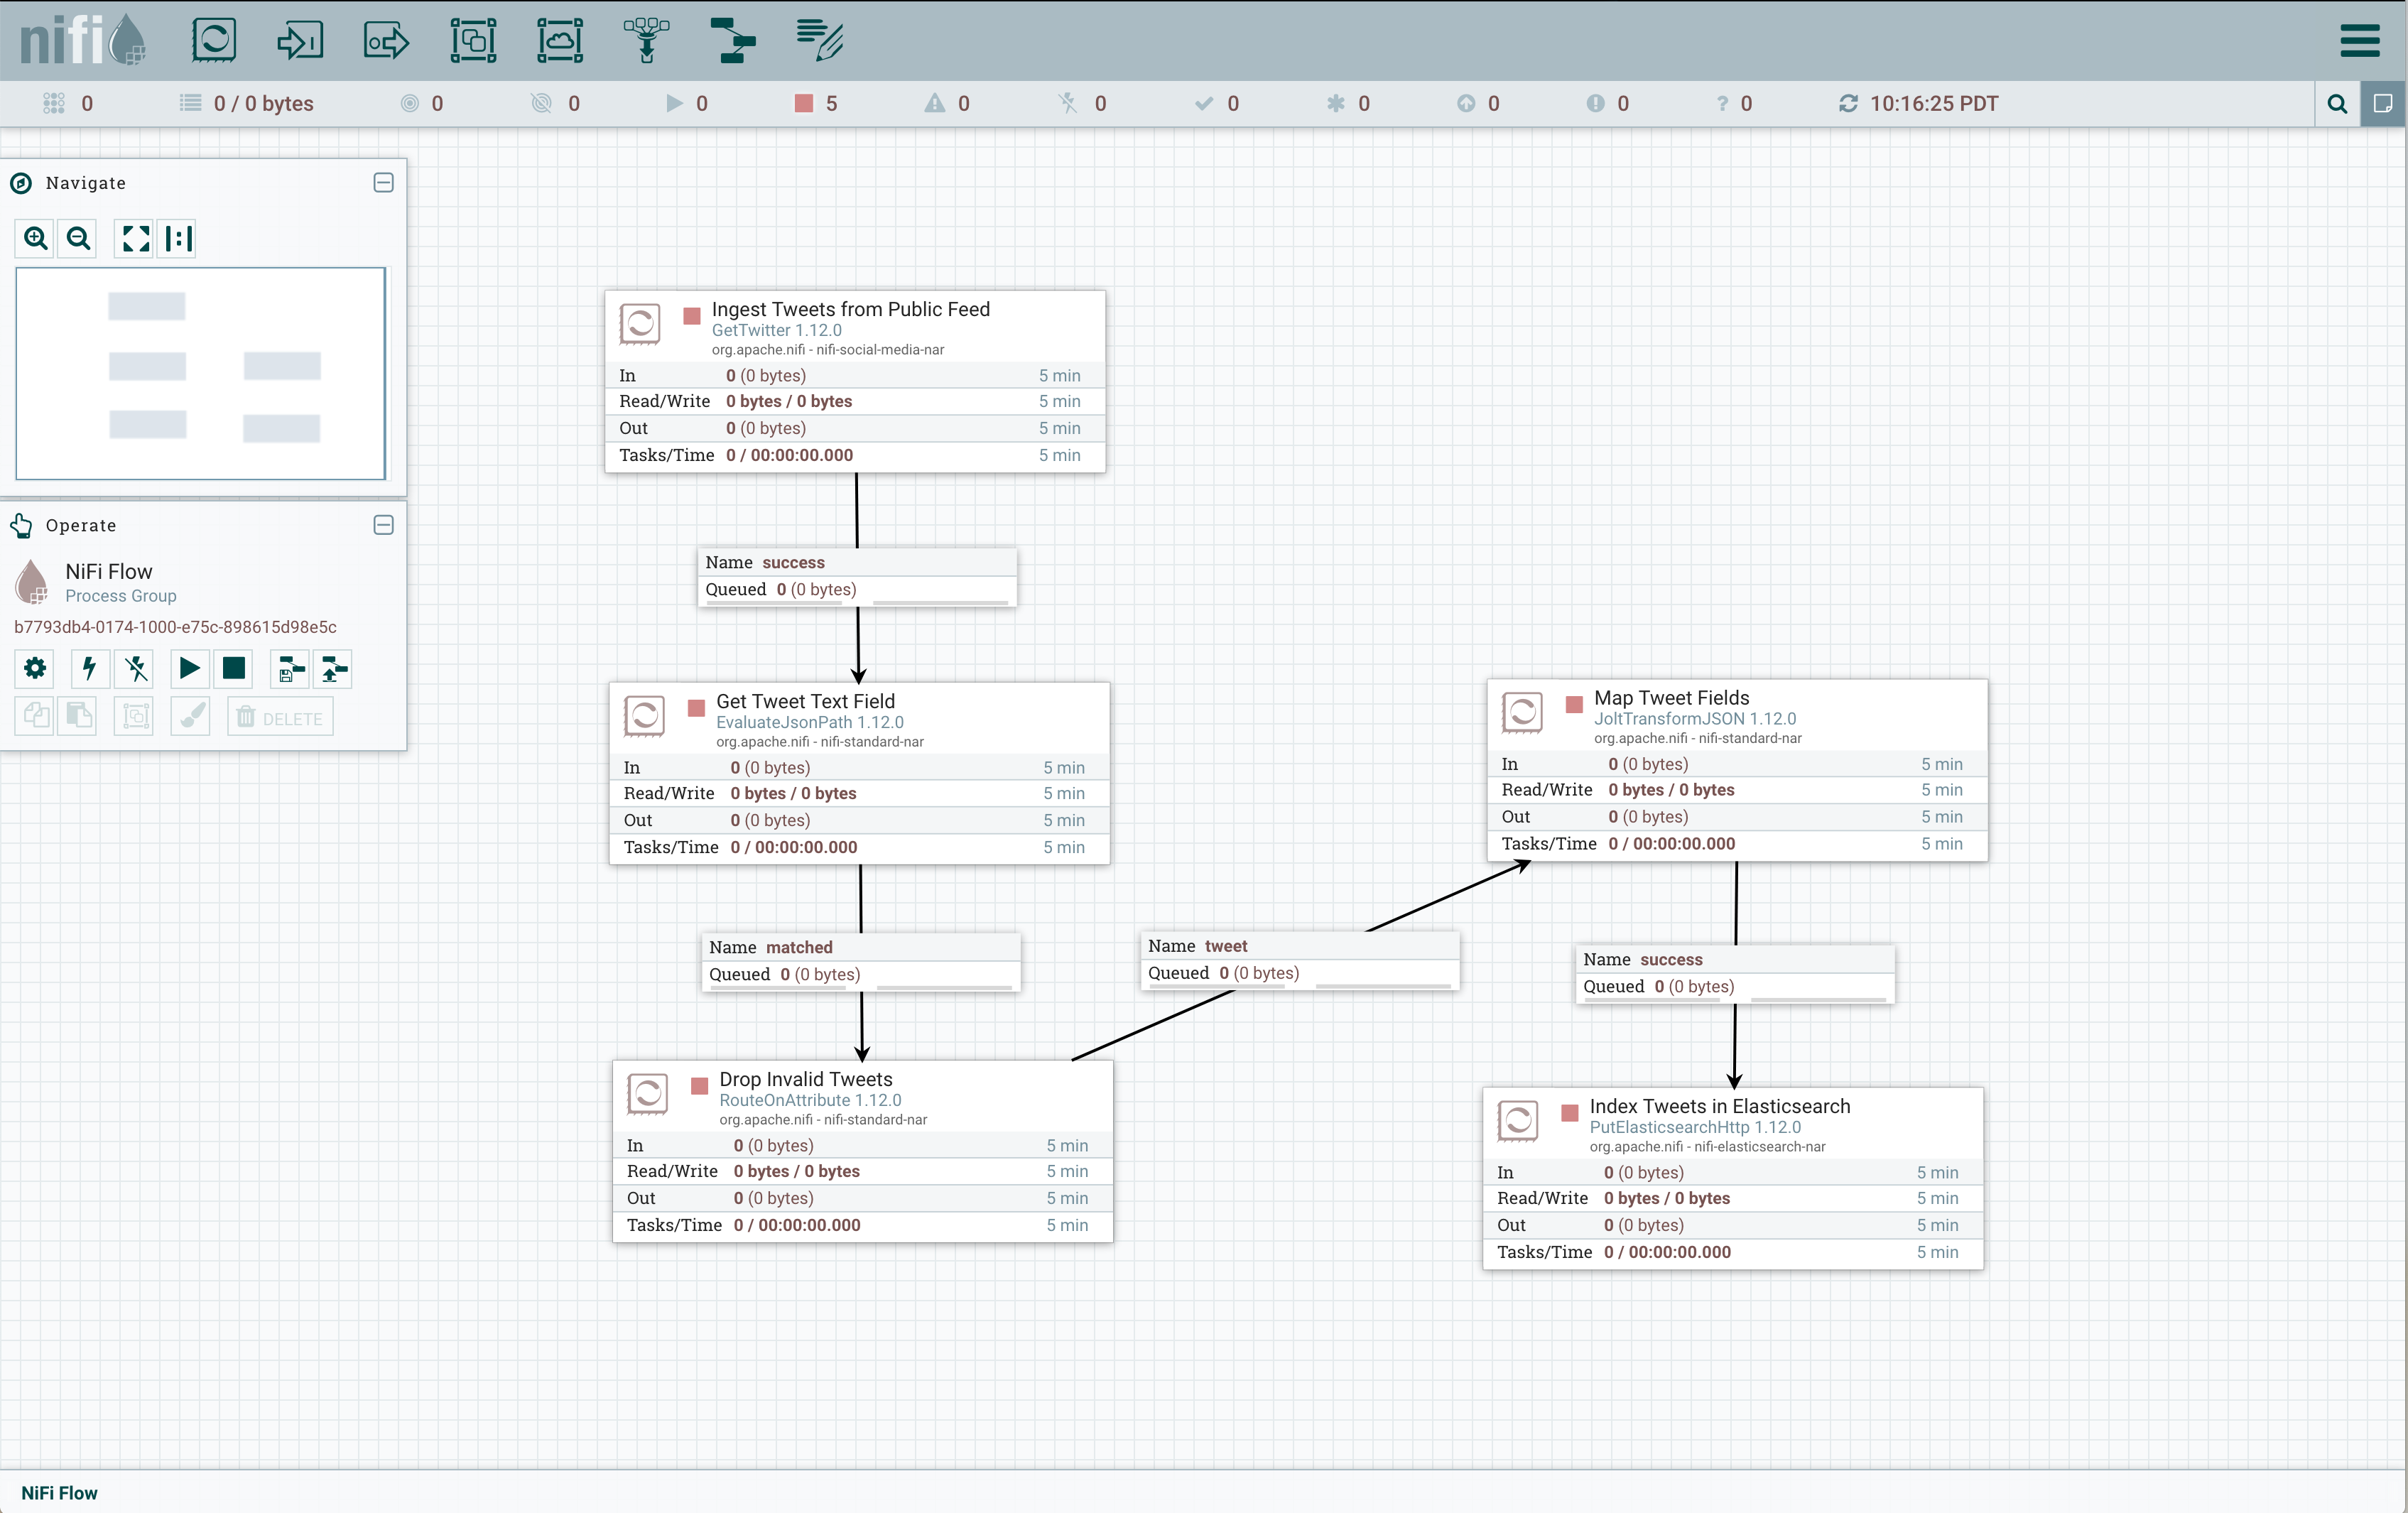
The Twitter data pipeline built in this article will use the following five processors in order, one connected to the other:
GetTwitter- Makes a connection with and receives tweet data from the Twitter Public Feed.EvaluateJsonPath- Extracts specified JSON fields to acted upon by downstream processors.RouteOnAttribute- Take actions on fields that come from an upstream processor.JoltTransformJson- Map and transform JSON fields.PutElasticsearchHttp- Index output messages in Elasticsearch using the RESTful API.
Processors are added to the NiFi console by dragging the processor button to the empty canvas.

When you release the processor button, a dialog box will be displayed in which you specify the processor you want to add.
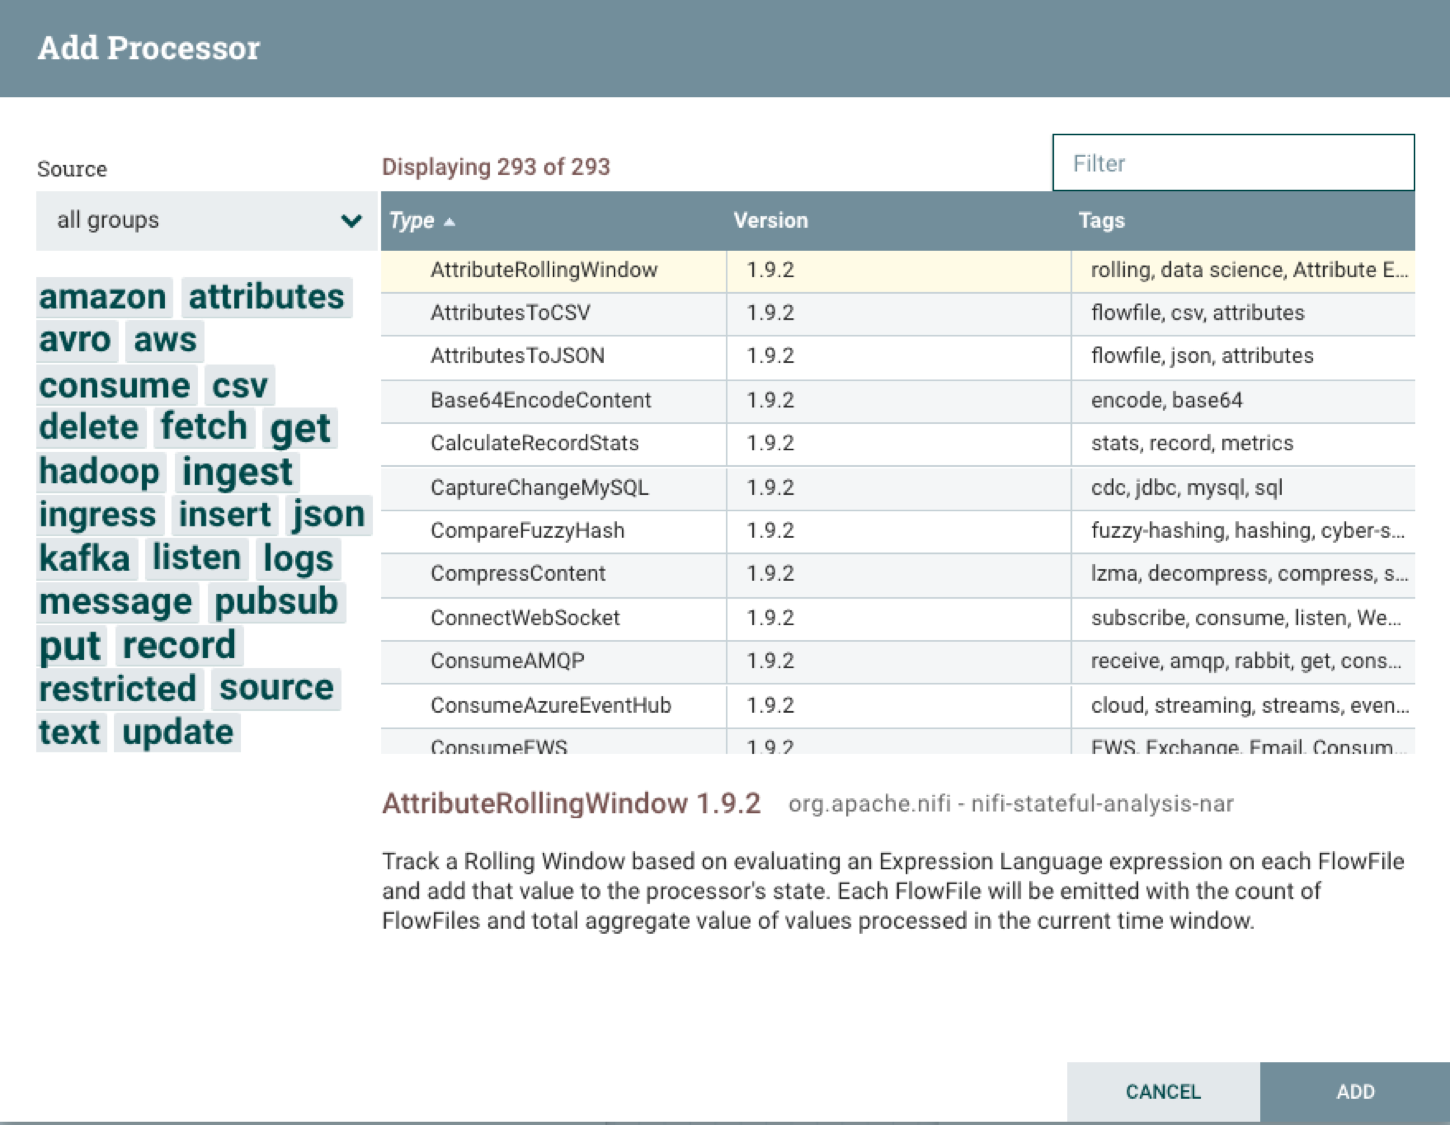
As you type in the Filter box, the list of processors will be whittled down until you type the one you want or select the one you want from the list. For this pipeline project, you will want to create the processors in the list, so you can just copy the text for each one into the Filter box and click on the Add button to create the processor in question. When you are done you can postion the processors to your liking, but in the end you will have a canvas that looks something like this:
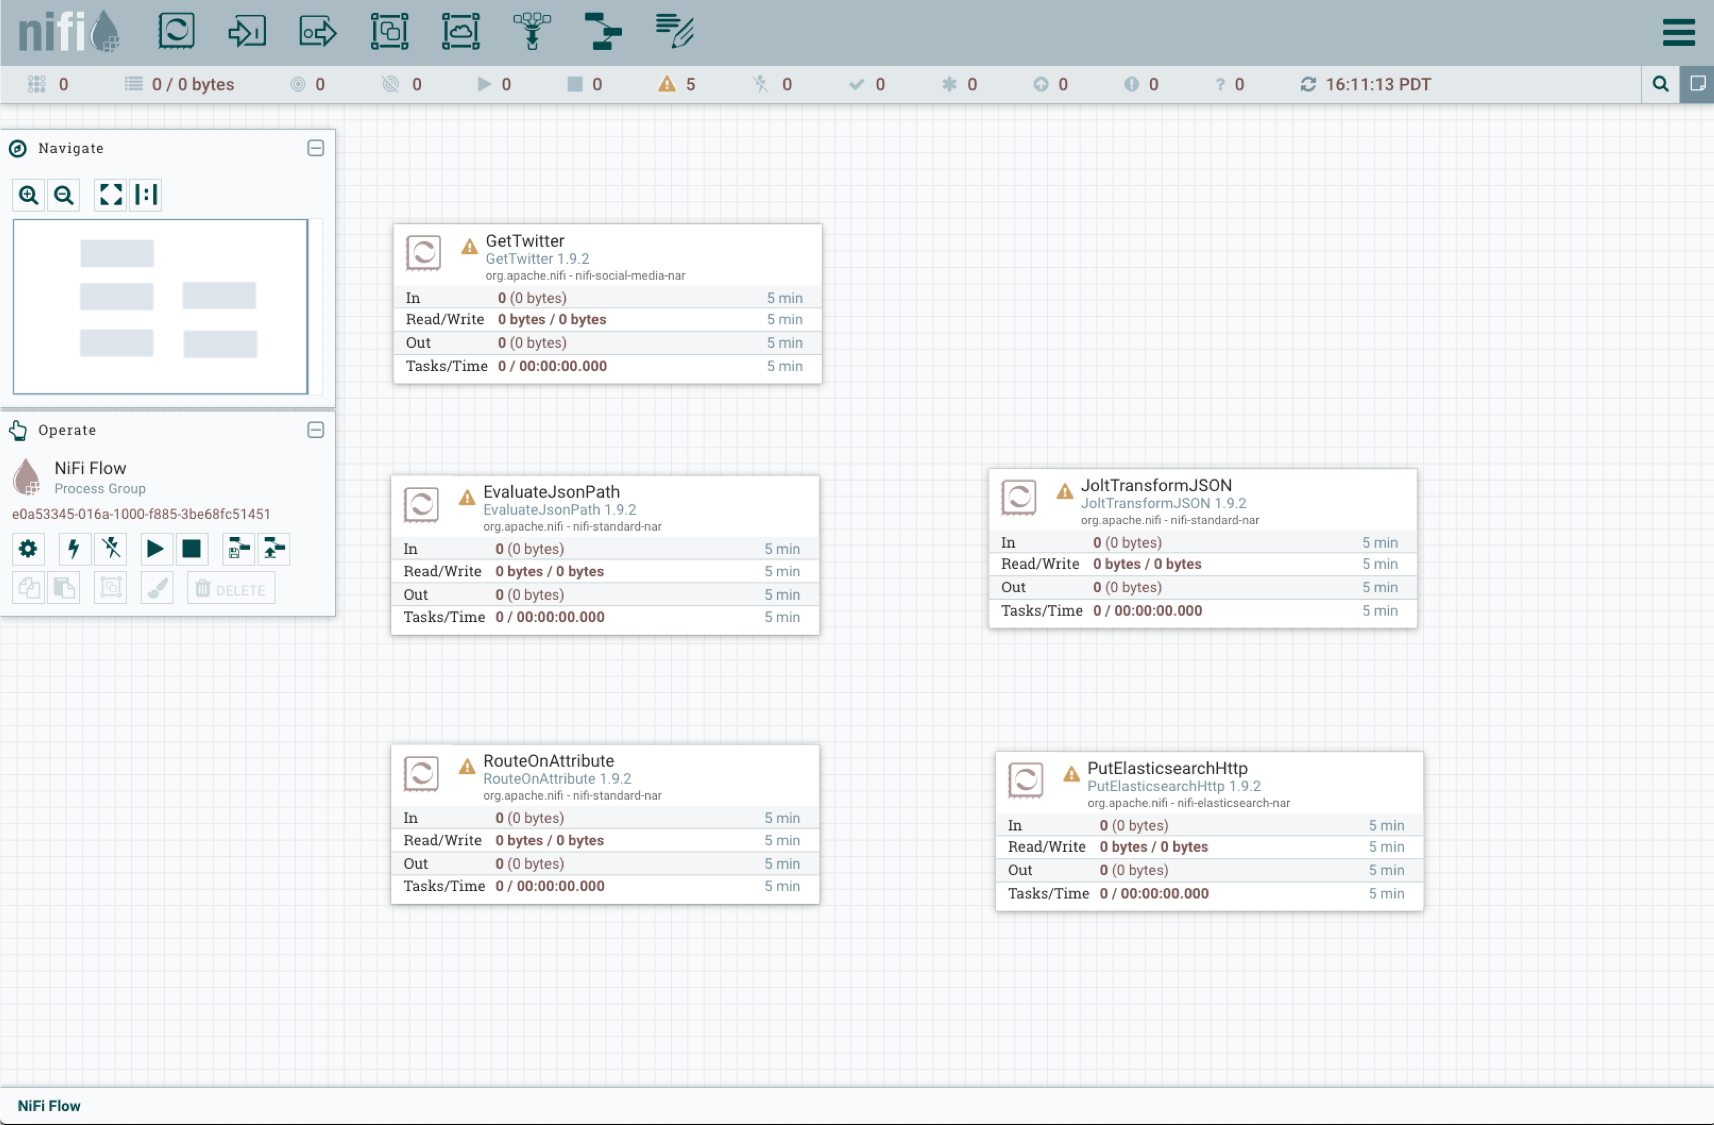
The processors show the yellow triangular indicator until they are configured. To configure a processor, right click anywhere on the proccessor panel then select Configure.
Configure Data Pipeline Processors
GetTwitter
Before configuring the GetTwitter processor, you have to create a Twitter application on the Twitter Developers site. After doing that you can click on the Details button for your app then the Keys and tokens tab to get consumer keys and access tokens you need to configure the processor. The GetTwitter configuration dialog box looks like this:
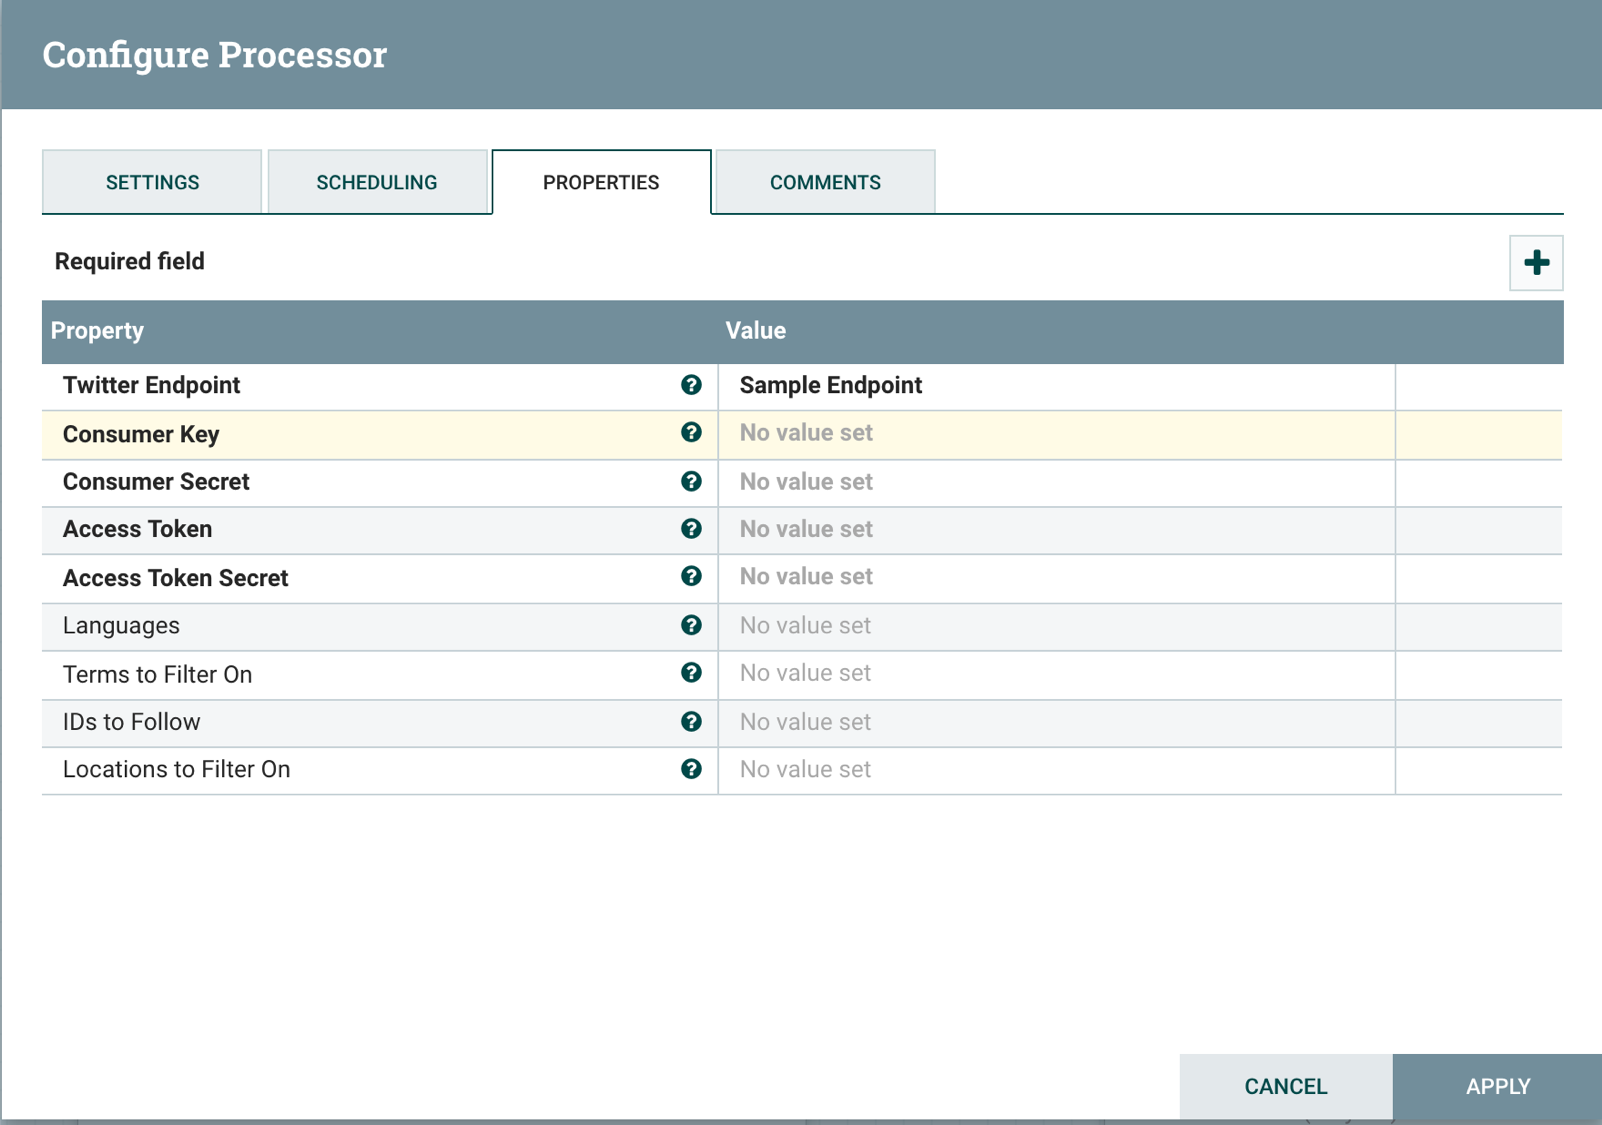
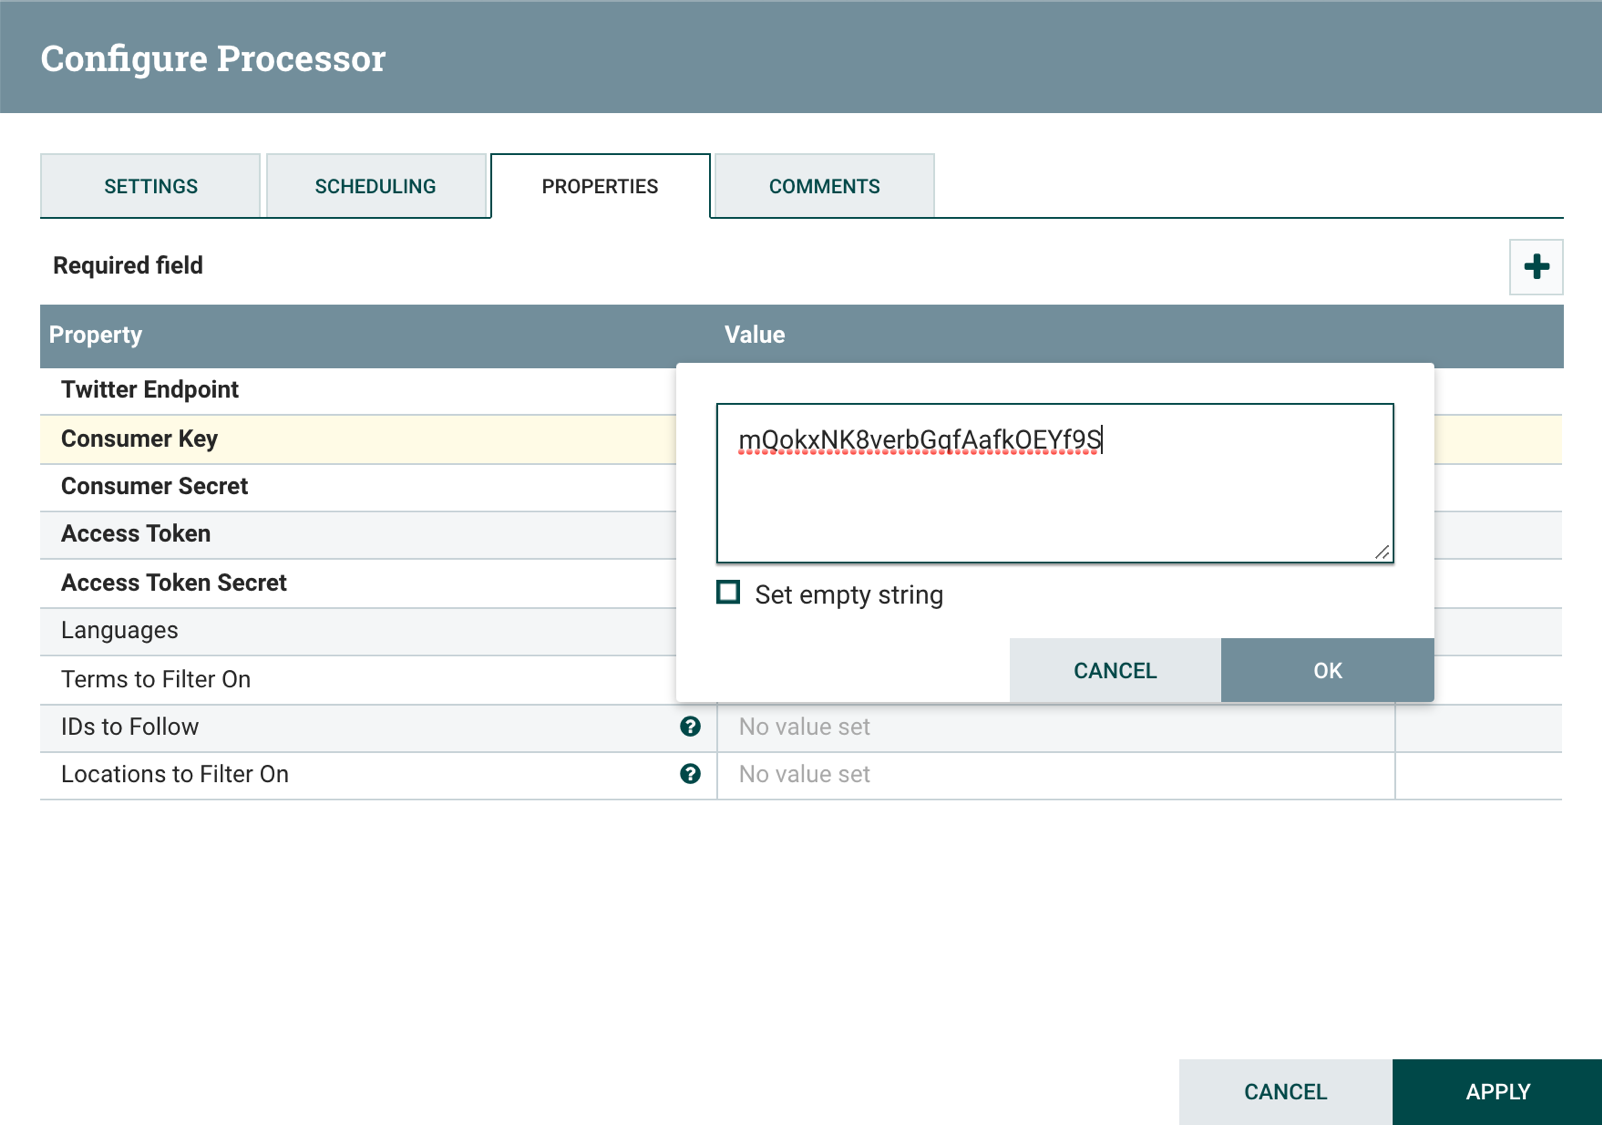
To enter consumer keys and access tokens, click on each property then enter the values for your Twitter app. Here is an example of how to add the Consumer key property:
It is a good idea to give the processors a descriptive name that summarizes what each one does. Select the Settings tab and enter the name Ingest Tweets from Public Feed.
When you are done configuring the processor, click on Apply to finish.
EvaluateJsonPath
The EvaluateJsonPath is used to check whether there is a text field present in each tweet. If there is it will set property with the text field string then pass it on to the RouteOnAttribute processor. Open the EvaluateJsonPath processor configuration dialog then set the Destination property to flowfile-attribute . Click on the plus icon to add the property twitter.text and set it to $.text as shown below:
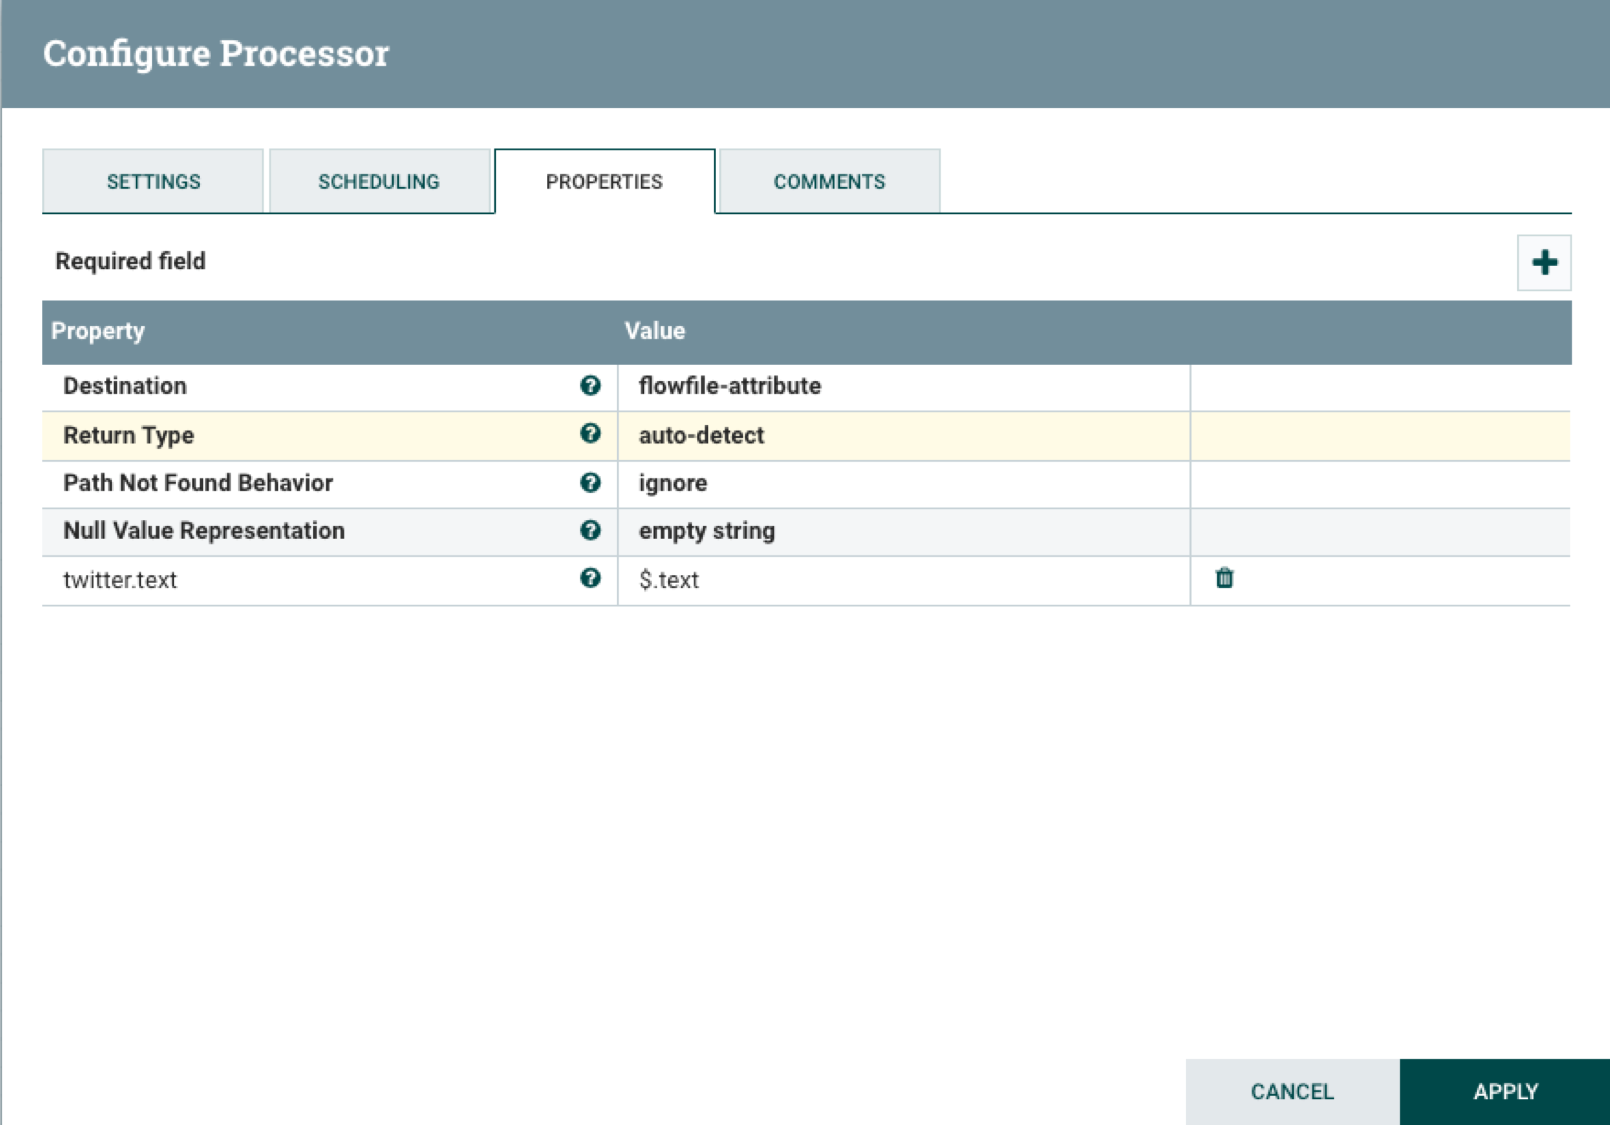
Set the processor name to Get Tweet Text Field in the Settings tab. Check the failure and unmatched boxes in the Automatically Terminate Relationships section to drop messages that are not properly formatted or do not have a text field.
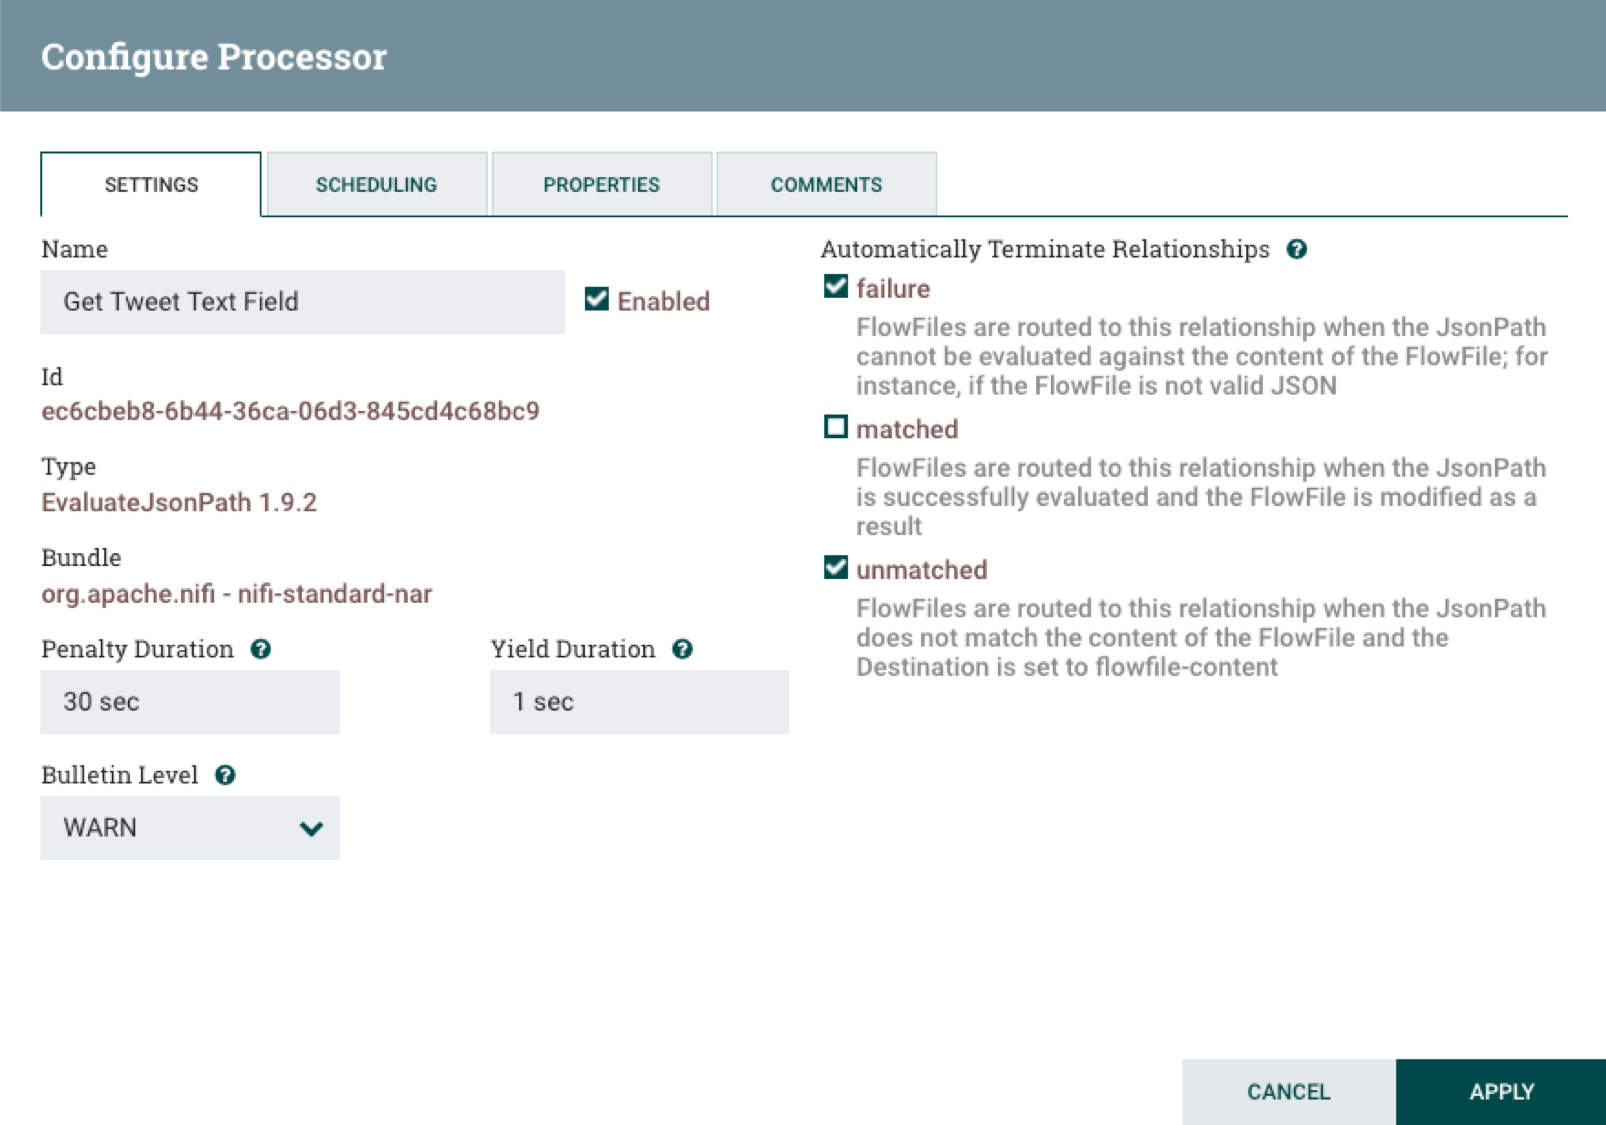
When you are done configuring the processor, click on Apply to finish.
RouteOnAttribute
The RouteOnAttribute processor forwards tweets from EvaluateJsonPath that have text fields with a lneght or 1 or more characters. To do that add a property called tweet then set it to ${twitter.text:isEmpty():not()}.
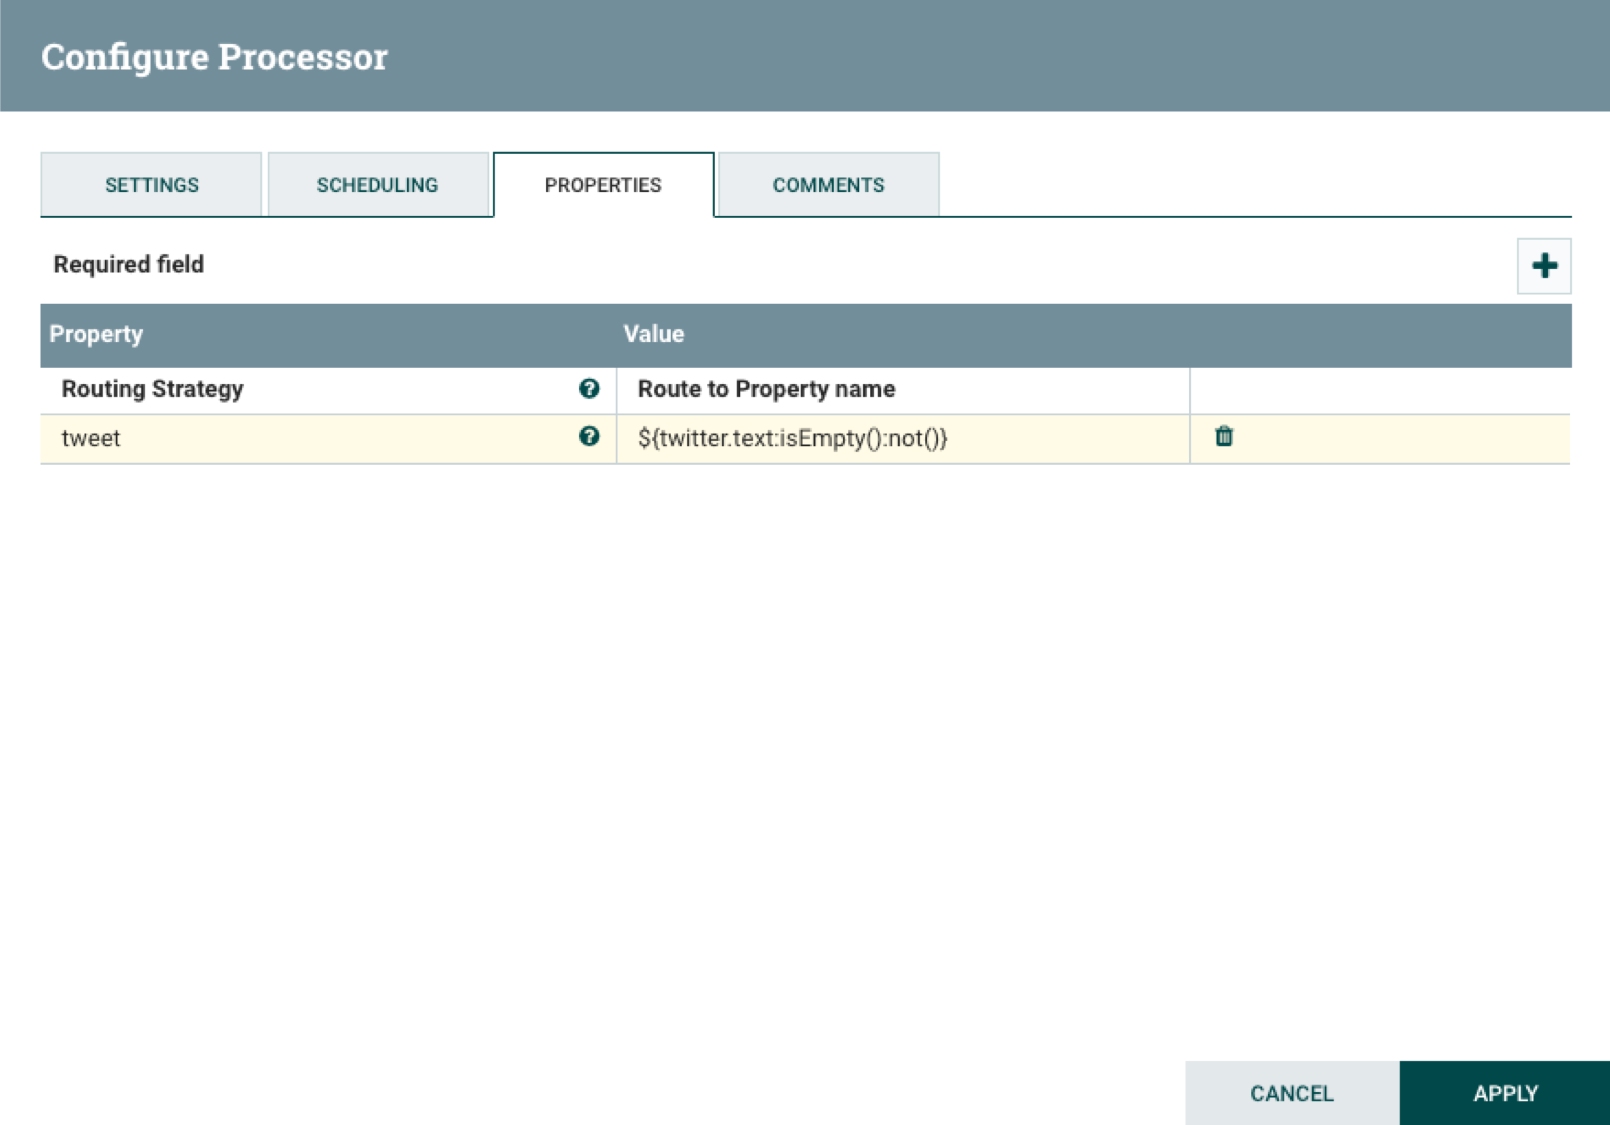
Then set the name of the processor to Drop Invalid Tweets and automatically terminate unmatched relationships.
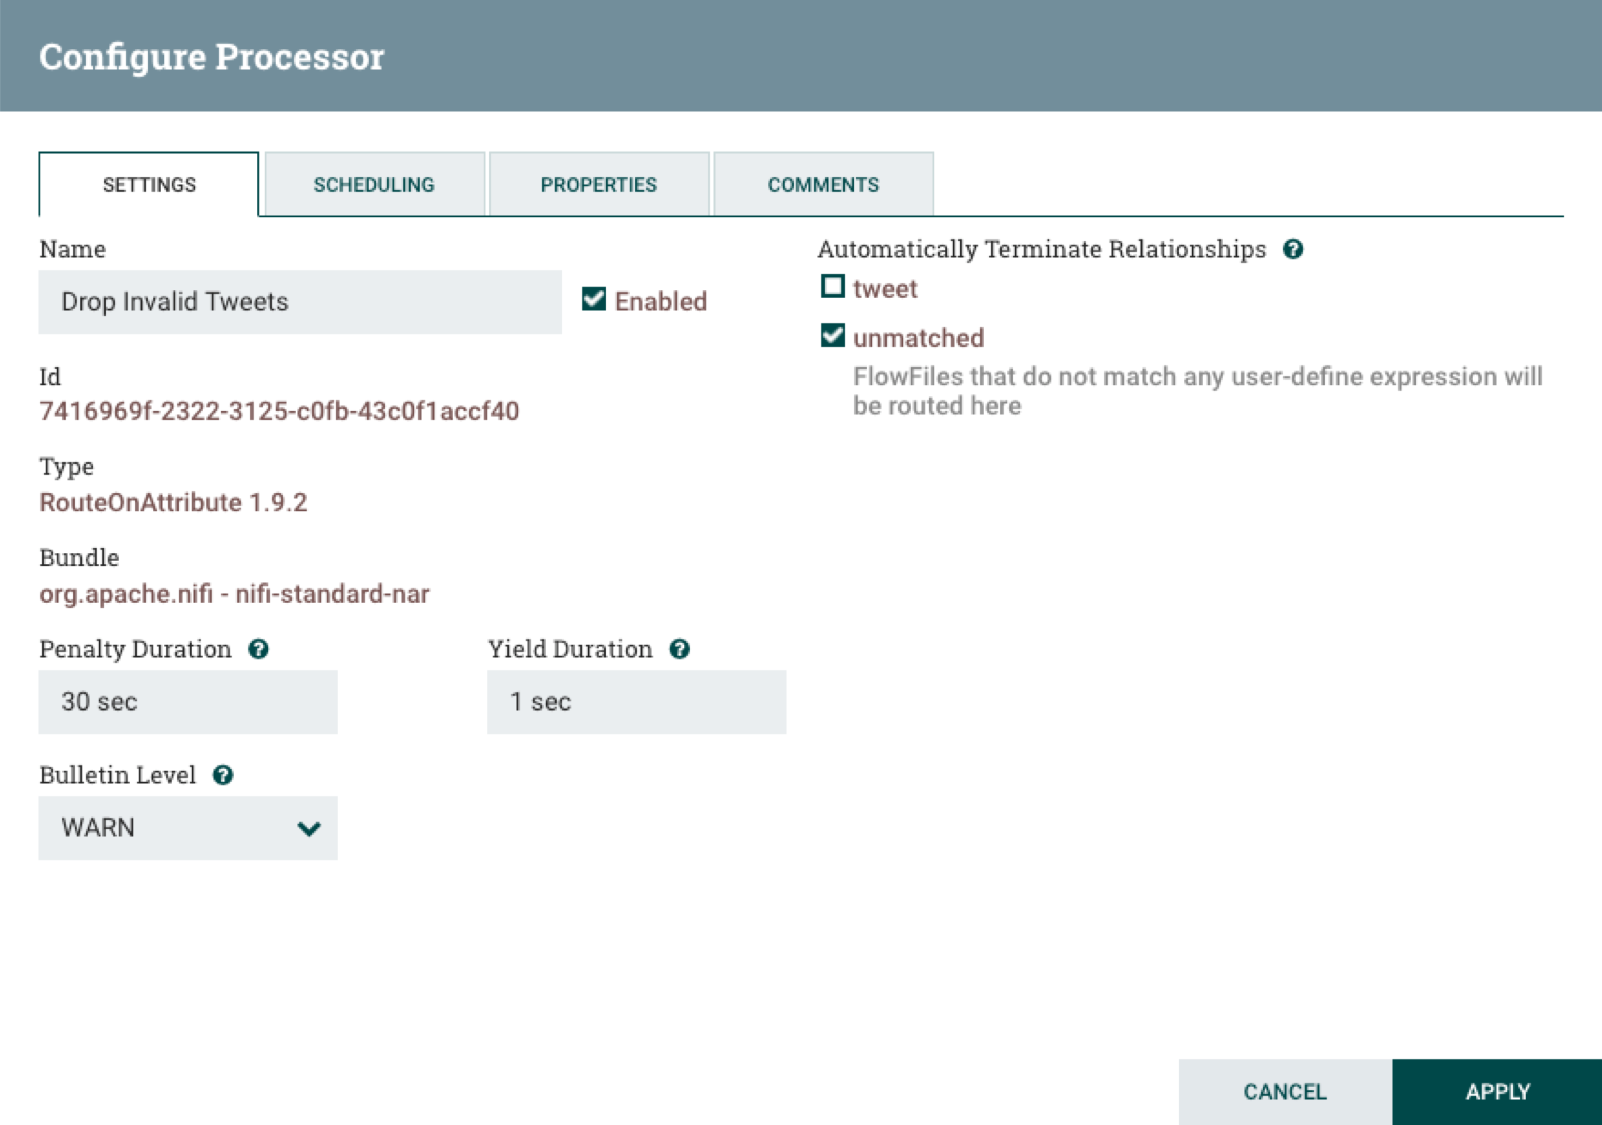
When you are done configuring the processor, click on Apply to finish.
JoltTransformJson
Tweets contain a lot of fields like tweet text, whether the tweet was favorited or retweeted, tweet time stamp, many user information fields, and so on. Elasticsearch limits the numebr of fields that can be indexed to 1000. This may seem a like number that would be tough to exceed, but well travelled tweets that have numerous retweets, favorites, hashtags, and the like can exceed this limit.
That’s where the JoltTransformJson processor comes in, by only forwarding a specific subset of JSON tweet fields. JoltTransformJson can also rename and map fields to your liking. JoltTransformJson maps fields with specifications that are comprised of one or more JSON objects that specify field name mappings. For tweets in this example, the processor specification retains most of the top level fields, with their original names. Several user object fields are flattened into the top level and the names are prepended with the term user to emphasize their meaning in a tweet.
To set the JoltTransformJson specification, open the processor configuration panel then add then copy and paste the following JSON into the Specification property:
[
  {
    "operation": "shift",
    "spec": {
      "created_at": "created_at",
      "id_str": "id_str",
      "text": "text",
      "source": "source",
      "favorited": "favorited",
      "retweeted": "retweeted",
      "possibly_sensitive": "possibly_sensitive",
      "lang": "lang",
      "user": {
        "id_str": "user_id_str",
        "name": "user_name",
        "screen_name": "user_screen_name",
        "description": "user_description",
        "verified": "user_verified",
        "followers_count": "user_followers_count",
        "friends_count": "user_friends_count",
        "listed_count": "user_listed_count",
        "favourites_count": "user_favourites_count",
        "created_at": "user_created_at",
        "lang": "user_lang"
      },
      "entities": {
        "urls": {
          "*": {
            "url": "url_&1",
            "expanded_url": "url_expanded_&1",
            "display_url": "url_display_&1"
          }
        }
      }
    }
  }
]
Click to the Settings tab set the processor name to Map Tweet Fields and check the failure automatic terminate relationship.
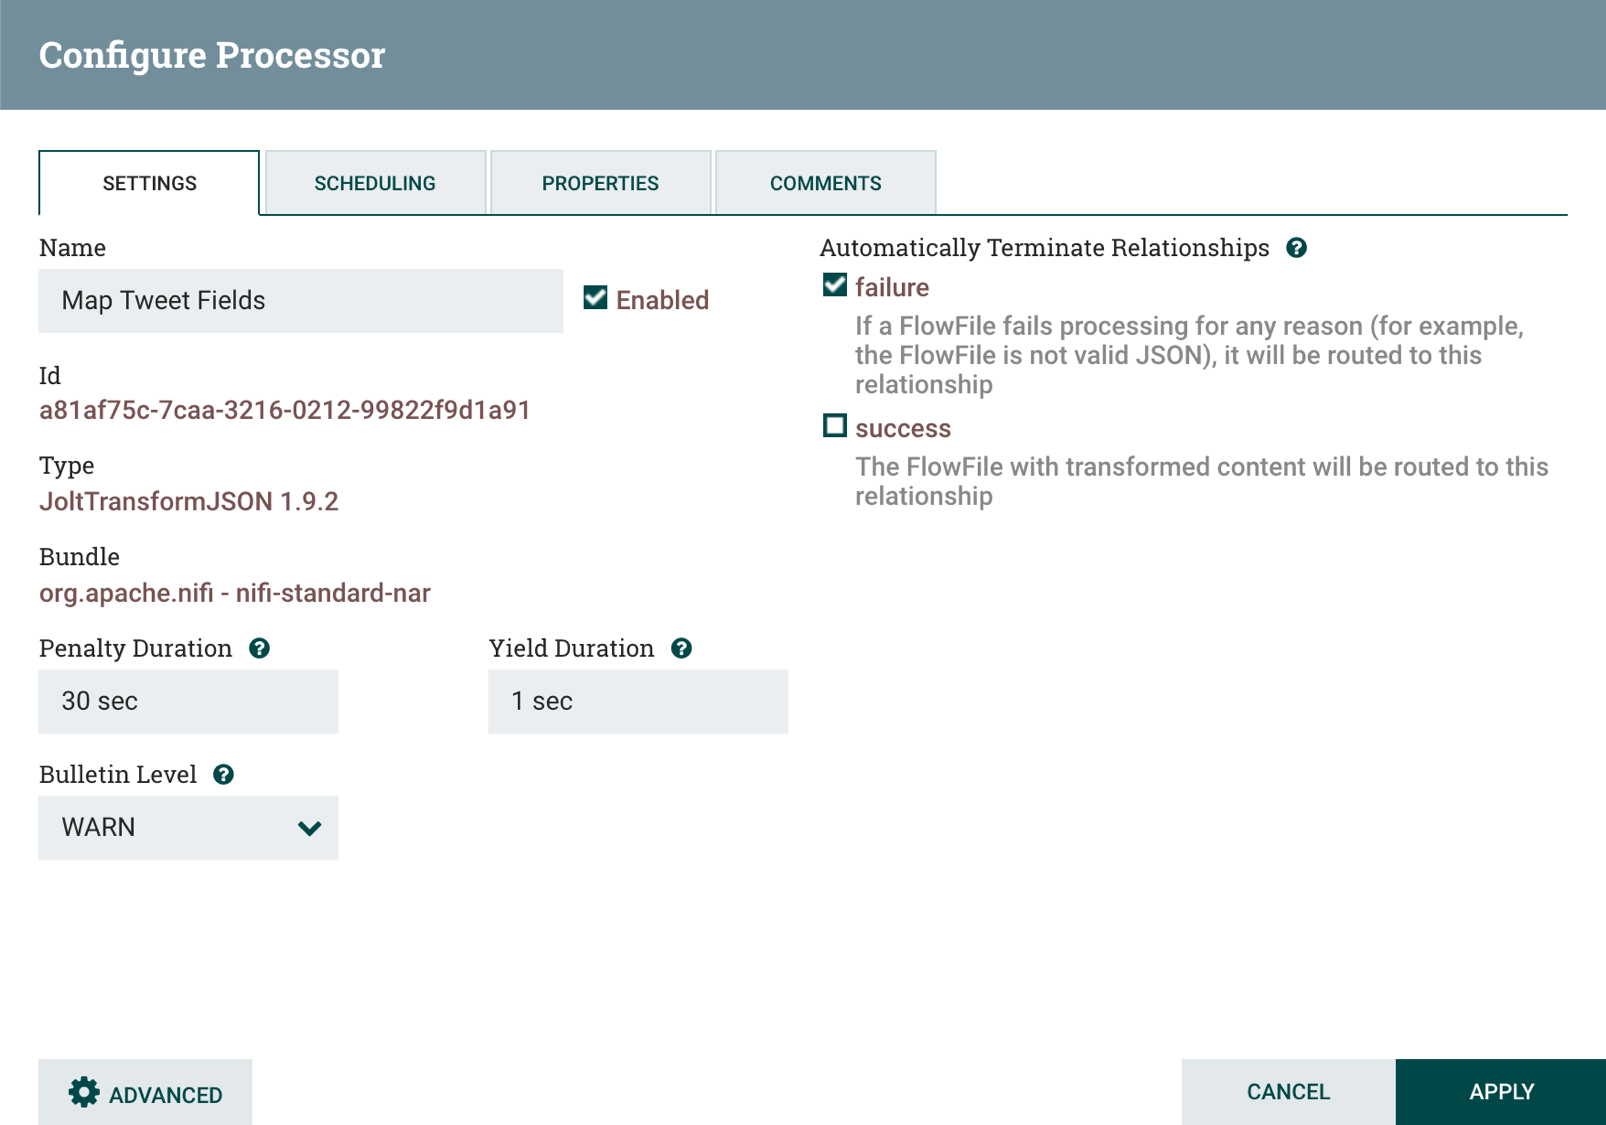
When you are done configuring the processor, click on Apply to finish.
PutElasticsearchHttp
PutElasticsearchHttp is the last processor in the data pipeline. It will take the mapped tweets from the JoltTransformJson process and index them in an Elasticsearch instance. To configure PutElasticsearchHttp, open the processor configuration panel then set these properties:
Elasticsearch URL-localhost:9200or another IP/host if Elasticsearch runs on a remote system.Index-tweets-$now():format(yyyy.MM.dd)}This will create a new index every day.Type-_docDefault type for Elasticsearch 7.x. Starting with this version you can only have one type per index.Index Operation-IndexSpecifies indexing tweets in Elasticsearch, as opposed to querying.
While the configuration dialog is open, click on the Settings tab then set the processor name to Index Tweets in Elasticsearch . Select the failure, retry, and success automatic terminate relationships.
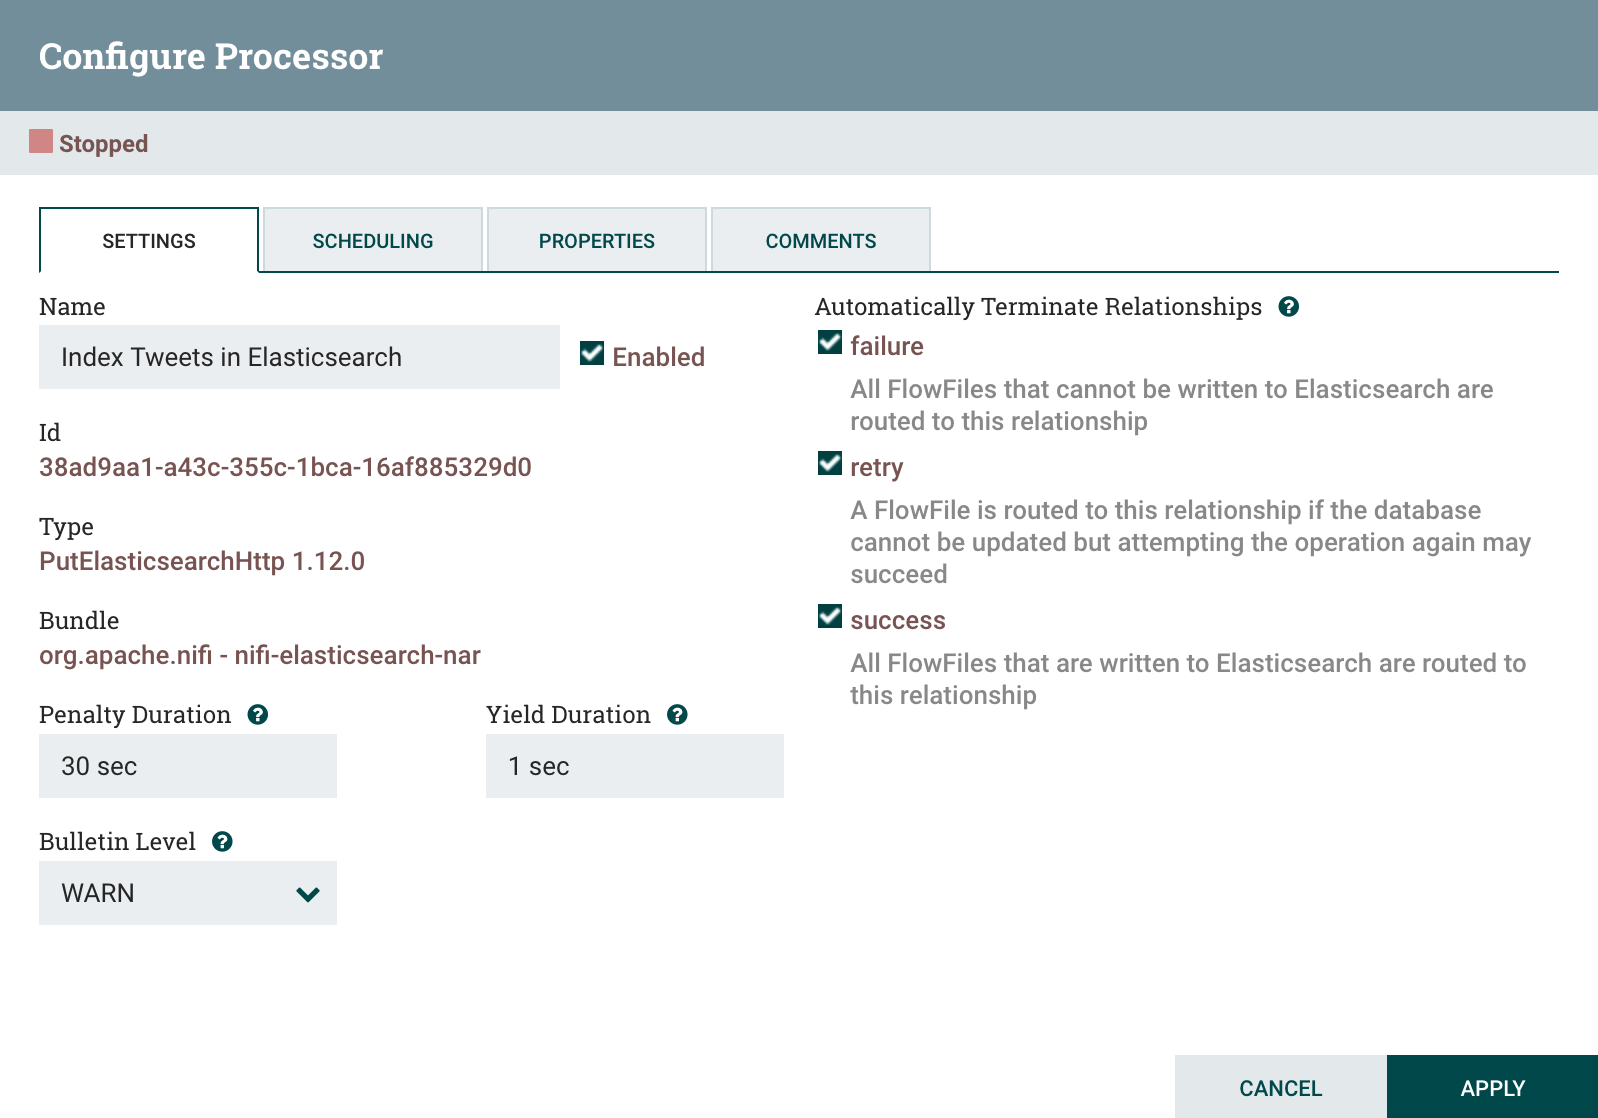
When you are done configuring the processor, click on Apply to finish.
Connect Data Pipeline Processors
The tweet data piepline processors can now be connected to define how tweets will move through the pipeline. To make the first connection, move your mouse over the GetTwitter processor until an arrow in a dark circle appears, as shown below:
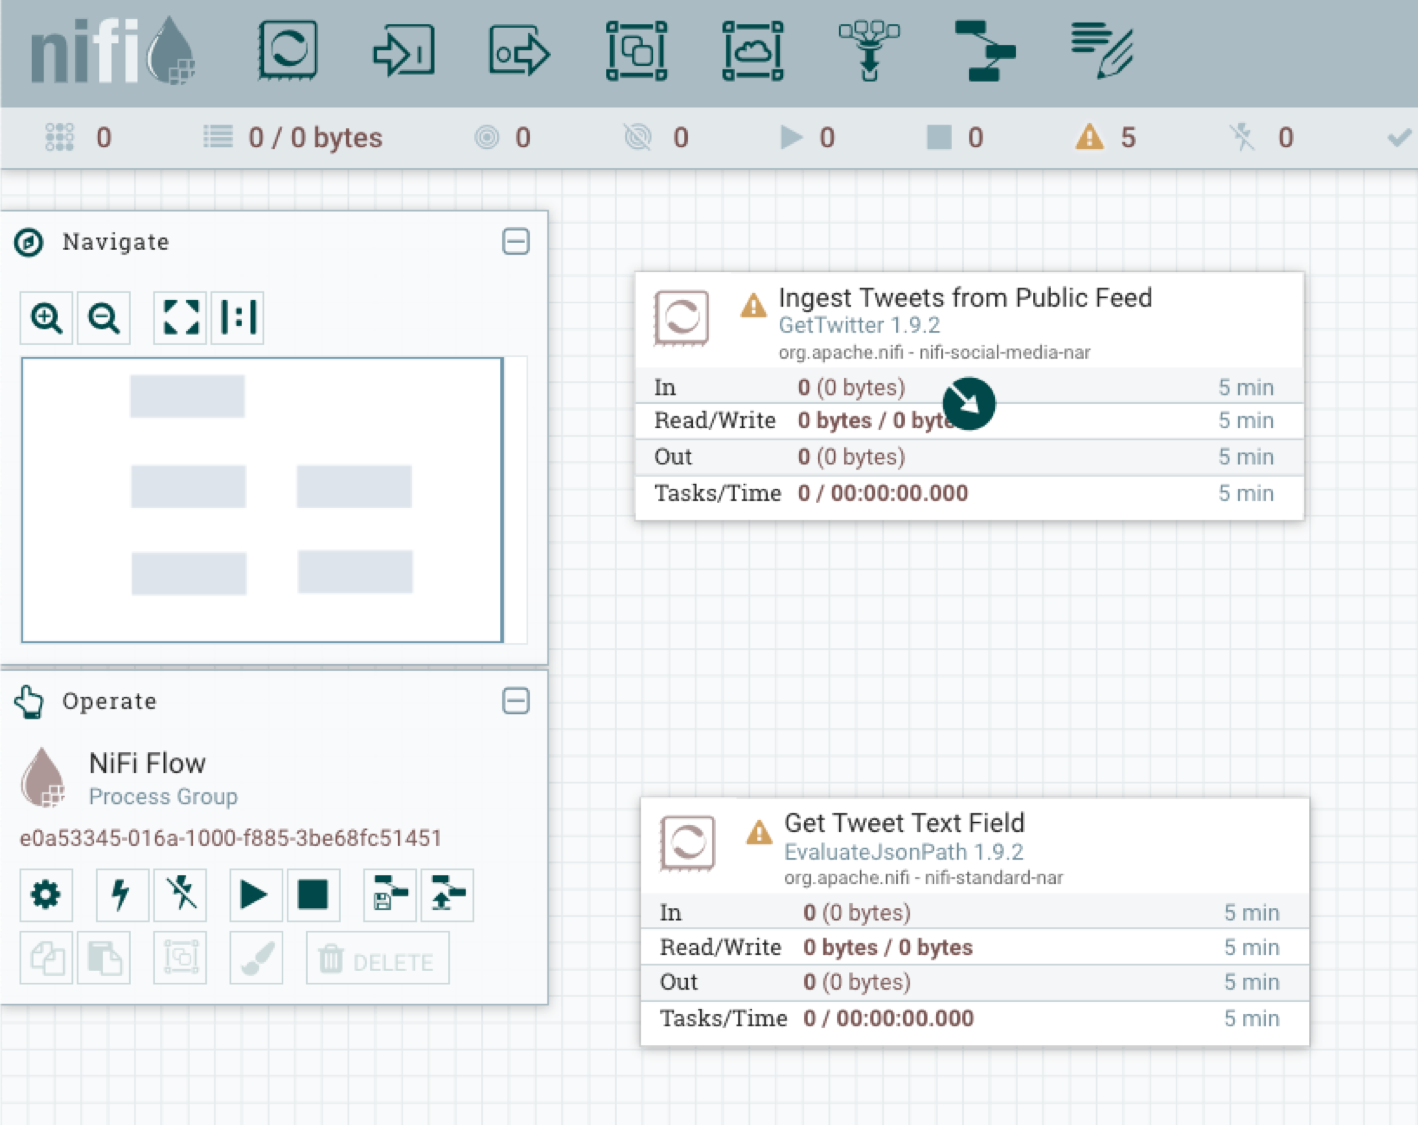
Drag the cursor outside of the processor box over to the GetTwitter processor box then release. the Create Connection dialog box will be produced:
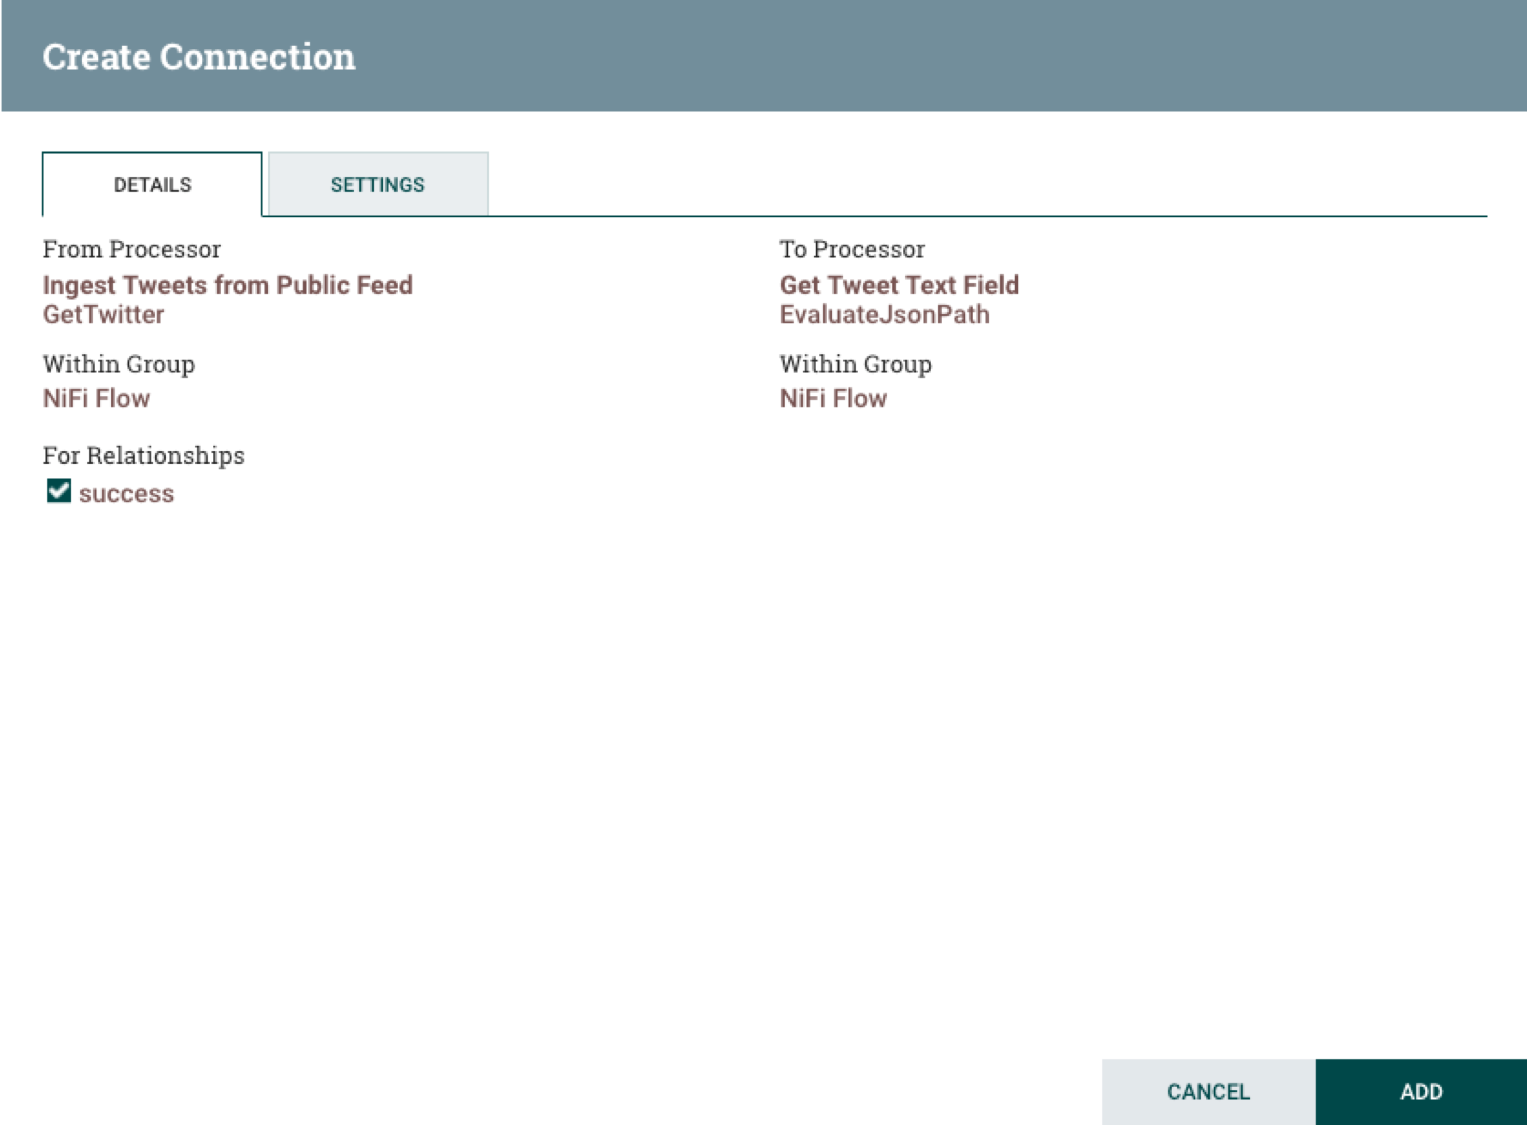
Click the Add button to complete the connection. Repeat this process to connect EvaluateJsonPath to RouteOnAttribute, RouteOnAttribute to JoltTransformJson, and JoltTransformJson to PutElasticsearchHttp.
When you get to PutElasticsearchHttp, click and drag the cursor without leaving the processor border then release. This connects the process to itself and produces another Create Connection dialog box. Check the failure, retry, and success boxes then click on the Add button to complete the connection. After all the connections are completed the data pipeline canvas should look like this:
To make it easier to start and stop the data pipeline, you can put the processors in a group. Select all the processors and connetions on the NiFi canvas by typing Command-A on a Mac keyboard or Ctrl-A on any other system keyboard, then click on the Group button in the Operate box to the left of the canvas.
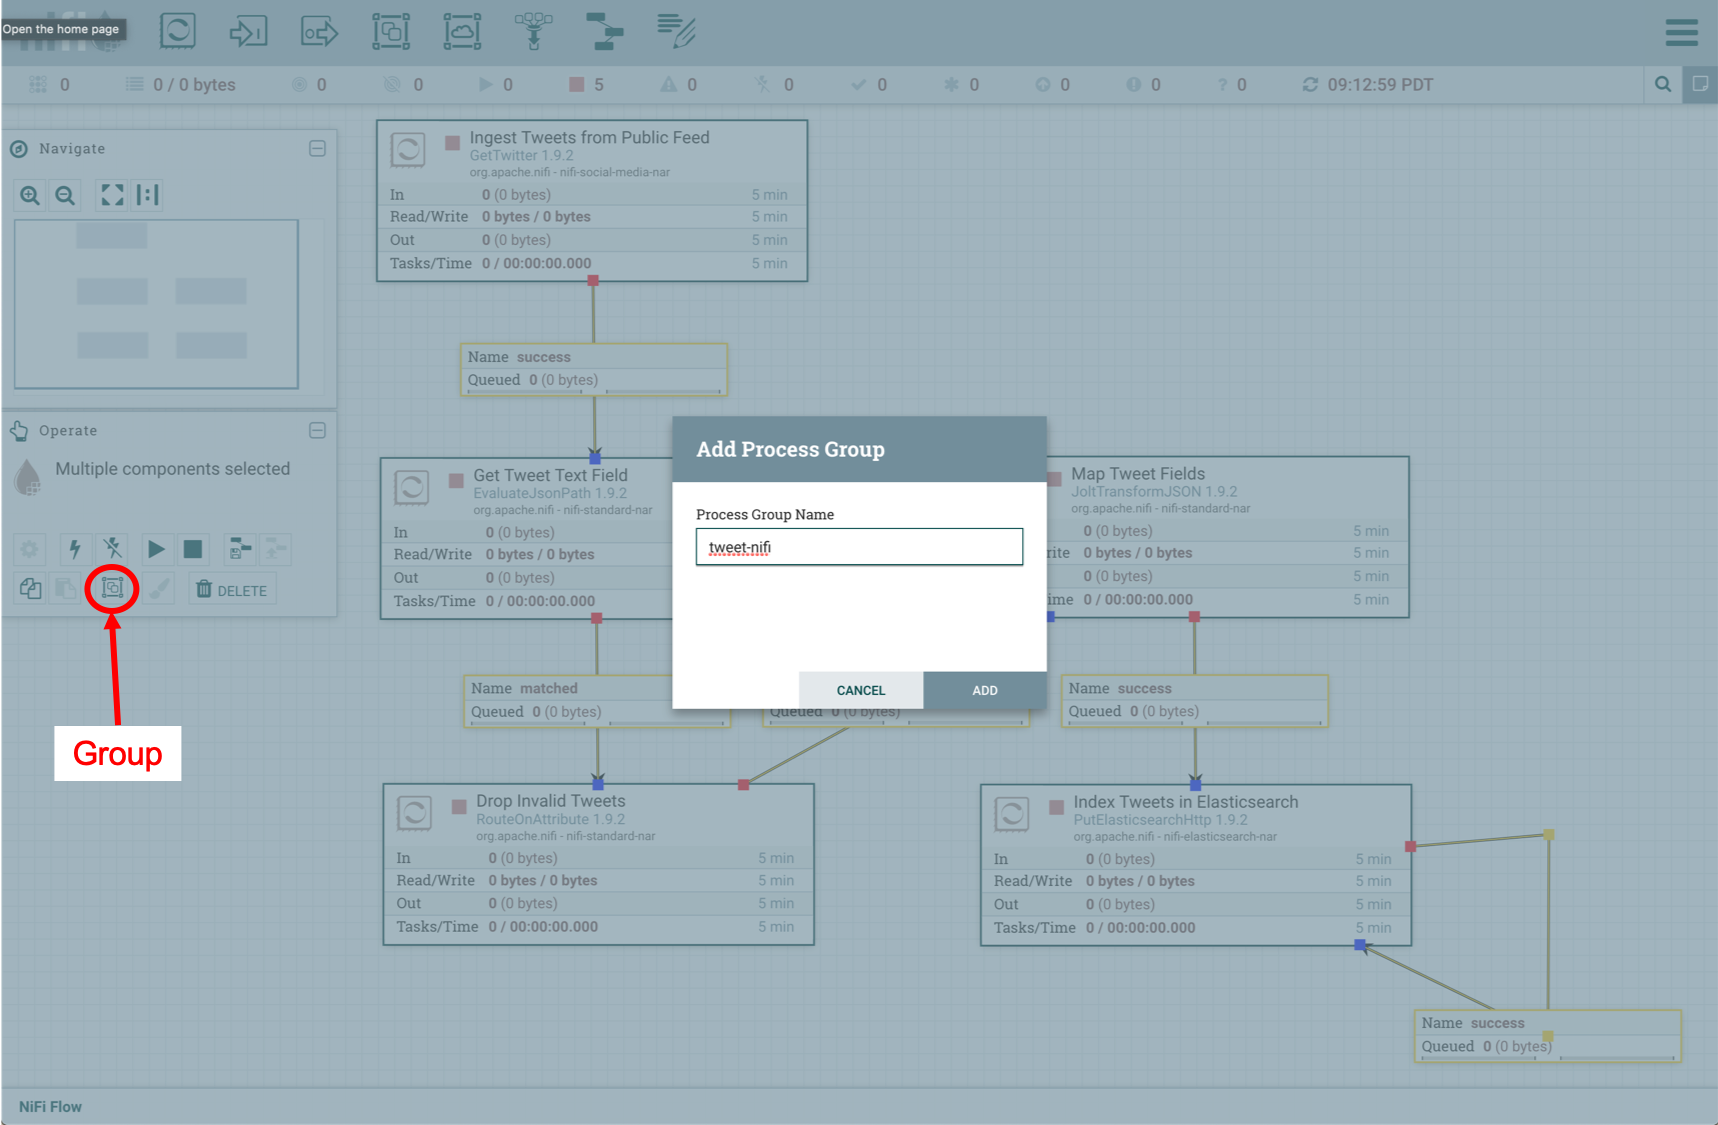
Enter tweet-nifi in the Process Group Name text box, then click on Add to finish. The NiFi canvas should now look like this:

The final step in building the pipeline is to save it as a template. Click on Create Template button in the Originate panel, then enter template name tweet-nifi , and click on the Create button. If at a later time you want to load the twiiter data pipeline tempalte and run it again, drag the Template button from the top toolbar and select the tweet-nifi template.

Tweet Index Mapping
When it comes to tweet indexing in Elasticsearch, the heavy lifting as far as field selection is concerned is done by the JoltTransformJson processor. Elasticsearch does a pretty good job of dynamically mapping fields, but dates can be a bit of a problem. By default Elasticsearch maps date fields either of these two formats:
strict_date_optional_time||epoch_millisexamples of which areyyyy-MM-dd'T'HH:mm:ss.SSSZe.g.2015-01-01T12:10:30Zoryyyy-MM-dde.g.2015-01-01epoch_milliswhich representes the milliseconds since the Epoch
Two Twitter date fields of interest are the created_at and user.created_at dates, the date of the tweet creation and when the person who issued the tweet joined Twitter. The Twitter stream formats these dates as Thu Jan 01 12:10:30 GMT 2015. NiFi outputs this as Thu Jan 01 12:10:30 0000 2015, so the created_at and user.created_at must be mapped as date with format "E MMM dd HH:mm:ss z yyyy||E MMM dd HH:mm:ss Z yyyy which accepts either kind of date. The follwing script maps the dates fields using these formats and sets the other field formats to defaults.
1
2
3
4
5
6
7
8
9
10
11
12
13
14
15
16
17
18
19
20
21
22
23
24
25
26
27
28
29
30
31
32
33
34
35
36
37
38
39
40
41
42
43
44
45
46
47
48
49
50
51
52
53
54
55
56
57
58
59
60
61
62
63
64
65
66
67
68
69
70
71
72
73
74
75
76
77
78
79
80
81
82
83
84
85
86
87
88
89
90
91
92
93
94
95
96
97
98
99
100
101
102
103
104
105
106
107
108
109
110
111
112
113
114
115
116
117
118
119
120
121
122
123
124
125
126
127
128
129
130
131
132
133
134
135
136
137
138
139
140
141
142
143
144
145
146
147
148
149
150
151
152
153
154
155
156
157
158
159
160
161
162
163
164
165
166
167
168
169
170
171
172
173
174
175
176
177
178
179
180
181
182
183
184
185
186
187
188
189
190
191
192
193
194
195
196
197
198
199
200
201
202
203
204
205
206
207
208
209
210
211
212
213
214
215
216
217
218
219
220
221
222
223
224
225
226
227
228
229
230
231
232
233
234
235
236
237
238
239
240
241
242
243
244
245
#!/usr/bin/env bash

if [[ $# -ne 1 ]] ; then
    echo "usage: tweets_template.sh node"
    exit
fi

curl -H 'Content-Type: application/json' -XPUT 'http://'$1'/_index_template/tweets' -d '
{
  "index_patterns": ["tweets-*"],
    "template" : {
      "mappings" : {
        "properties" : {
          "created_at" : {
            "type" : "date",
			"format": "E MMM dd HH:mm:ss z yyyy||E MMM dd HH:mm:ss Z yyyy",
            "fields" : {
              "keyword" : {
                "type" : "keyword",
                "ignore_above" : 256
              }
            }
          },
          "favorited" : {
            "type" : "boolean"
          },
          "id_str" : {
            "type" : "text",
            "fields" : {
              "keyword" : {
                "type" : "keyword",
                "ignore_above" : 256
              }
            }
          },
          "lang" : {
            "type" : "text",
            "fields" : {
              "keyword" : {
                "type" : "keyword",
                "ignore_above" : 256
              }
            }
          },
          "possibly_sensitive" : {
            "type" : "boolean"
          },
          "retweeted" : {
            "type" : "boolean"
          },
          "source" : {
            "type" : "text",
            "fields" : {
              "keyword" : {
                "type" : "keyword",
                "ignore_above" : 256
              }
            }
          },
          "text" : {
            "type" : "text",
            "fields" : {
              "keyword" : {
                "type" : "keyword",
                "ignore_above" : 256
              }
            }
          },
          "url_0" : {
            "type" : "text",
            "fields" : {
              "keyword" : {
                "type" : "keyword",
                "ignore_above" : 256
              }
            }
          },
          "url_1" : {
            "type" : "text",
            "fields" : {
              "keyword" : {
                "type" : "keyword",
                "ignore_above" : 256
              }
            }
          },
          "url_2" : {
            "type" : "text",
            "fields" : {
              "keyword" : {
                "type" : "keyword",
                "ignore_above" : 256
              }
            }
          },
          "url_3" : {
            "type" : "text",
            "fields" : {
              "keyword" : {
                "type" : "keyword",
                "ignore_above" : 256
              }
            }
          },
          "url_display_0" : {
            "type" : "text",
            "fields" : {
              "keyword" : {
                "type" : "keyword",
                "ignore_above" : 256
              }
            }
          },
          "url_display_1" : {
            "type" : "text",
            "fields" : {
              "keyword" : {
                "type" : "keyword",
                "ignore_above" : 256
              }
            }
          },
          "url_display_2" : {
            "type" : "text",
            "fields" : {
              "keyword" : {
                "type" : "keyword",
                "ignore_above" : 256
              }
            }
          },
          "url_display_3" : {
            "type" : "text",
            "fields" : {
              "keyword" : {
                "type" : "keyword",
                "ignore_above" : 256
              }
            }
          },
          "url_expanded_0" : {
            "type" : "text",
            "fields" : {
              "keyword" : {
                "type" : "keyword",
                "ignore_above" : 256
              }
            }
          },
          "url_expanded_1" : {
            "type" : "text",
            "fields" : {
              "keyword" : {
                "type" : "keyword",
                "ignore_above" : 256
              }
            }
          },
          "url_expanded_2" : {
            "type" : "text",
            "fields" : {
              "keyword" : {
                "type" : "keyword",
                "ignore_above" : 256
              }
            }
          },
          "url_expanded_3" : {
            "type" : "text",
            "fields" : {
              "keyword" : {
                "type" : "keyword",
                "ignore_above" : 256
              }
            }
          },
          "user_created_at" : {
            "type" : "date",
			"format" : "E MMM dd HH:mm:ss z yyyy||E MMM dd HH:mm:ss Z yyyy"
            "fields" : {
              "keyword" : {
                "type" : "keyword",
                "ignore_above" : 256
              }
            }
          },
          "user_description" : {
            "type" : "text",
            "fields" : {
              "keyword" : {
                "type" : "keyword",
                "ignore_above" : 256
              }
            }
          },
          "user_favourites_count" : {
            "type" : "long"
          },
          "user_followers_count" : {
            "type" : "long"
          },
          "user_friends_count" : {
            "type" : "long"
          },
          "user_id_str" : {
            "type" : "text",
            "fields" : {
              "keyword" : {
                "type" : "keyword",
                "ignore_above" : 256
              }
            }
          },
          "user_listed_count" : {
            "type" : "long"
          },
          "user_name" : {
            "type" : "text",
            "fields" : {
              "keyword" : {
                "type" : "keyword",
                "ignore_above" : 256
              }
            }
          },
          "user_screen_name" : {
            "type" : "text",
            "fields" : {
              "keyword" : {
                "type" : "keyword",
                "ignore_above" : 256
              }
            }
          },
          "user_verified" : {
            "type" : "boolean"
          }
        }
      }
    }
  }
}'


echo
The node argument for this script refers to the Elasticsearch IP and port, e.g. localhost:9200.
The index pattern is set to tweets-* in lines 13 - 15, meaning that the mapping will be applied to any tweet index that has a name the begins with tweet-. Numerical and boolean tweet fields are mapped accordingly. All other text and date fields are mapped as text and include an additional keyword field for sorting.
Run this script for the Elasticsearch instance you are using, then the mapping template will be set to go.
./tweets_template.sh localhost:9200Run the Data Pipeline
If you want to just get started with tweet ingestion, you can get the source code on Github in the tweet-nifi repo. After unpacking the tarball, you can load the tweet-nifi facility by following these steps:
- Click on the Upload Template button in the Operate pane.
- Click on the maginfying glass icon next to the text Select Template in the Upload Template pane.
- Navigate to the directory where you unpacked the tweet-nifi tarball.
- Select the tweet-nifi.xml file.
- Click Open.
- Click on the UPLOAD button in the Upload Template pane.
- Click on the Template button on the top of the NiFi window, then drag it to the open canvas.
- Select the tweet-nifi template from the the Choose Template dropdown menu.
- Click the Add button.
Now double click on the Ingest Tweets from Public Feed process and set the Twitter Consumer and Access Token fields as described earlier in this article.
To start the tweet ingestion and indexing, click on the play button in the Operate box. After running the piepline for several minutes, you can run a query to check that tweets were indexed. Run a curl command like this:
curl http://localhost:9200/tweets\*/_search\?prettyThe output of this command should look like this:
{
  "took" : 4565,
  "timed_out" : false,
  "_shards" : {
    "total" : 1,
    "successful" : 1,
    "skipped" : 0,
    "failed" : 0
  },
  "hits" : {
    "total" : {
      "value" : 10000,
      "relation" : "gte"
    },
    "max_score" : 1.0,
    "hits" : [
      {
        "_index" : "tweets-2019.05.25",
        "_type" : "_doc",
        "_id" : "xS_P8WoBB9fmJNnwbj2e",
        "_score" : 1.0,
        "_source" : {
          "created_at" : "Sun May 26 01:44:12 +0000 2019",
          "id_str" : "1132462407165632512",
          "text" : "RT @startrekcbs: 25 years after #StarTrek #TNG ended, a new chapter begins. #StarTrekPicard starring @SirPatStew is coming soon to @CBSAllA…",
          "source" : "<a href=\"http://twitter.com/download/android\" rel=\"nofollow\">Twitter for Android</a>",
          "favorited" : false,
          "retweeted" : false,
          "lang" : "en",
          "user_id_str" : "15274698",
          "user_name" : "Colby Ringeisen",
          "user_screen_name" : "colbyringeisen",
          "user_description" : "Software Engineer in #ATx, #Longhorns fan, dog owner, mountain biker #mtb, part-time hermit",
          "user_verified" : false,
          "users_followers_count" : 120,
          "users_friends_count" : 361,
          "users_listed_count" : 9,
          "user_favourites_count" : 49,
          "user_created_at" : "Mon Jun 30 00:43:06 +0000 2008",
          "user_lang" : null
        }
      },

...
Summing Up
Now that you have a basic working NiFi data pipeline, there are several things you can explore to improve it. If you want to expand the number of tweet fields you ingest, you can add the field maps to the JoltTransformJson processor and the tweets_template.sh .
Running NiFI and Elasticsearch on a single system may cause the NiFi queues to hit a critical point and bog down considerably. It’s possible to run NiFi on a cluster of systems to get better throughput. It might also be a good idea to run Elasticsearch on a separate cluster.


Leave a comment