
Elasticsearch Client Programming - Python
The first article in this two part series focused on developing Elasticsearch clients with Perl. Elasticsearch also has an excellent Python library which lets you search for and analyze your data with one of the many mathematics and machine learning libraries available for Python.
In this article I’ll cover how to create an Elasticsearch client using Python that has the same capabilities as the Perl client from the part 1 article.
Got Anaconda Python?
There are many ways to get Python on your system, if you don’t have it already. It usually comes pre-installed on Linux systems. But I’ve developed a fondness for Anaconda Python provided by Continuum Analytics. Anaconda Python comes complete with a large set of libraries, including specialized machine learning modules such as NumPym, SciPy, scikit-image, scikit-learn, etc. Since I work with a machine learning group, I find this aspect of Anaconda Python particularly appealing. You can download Anaconda Python here.
Install PyDev Plug-in for Eclipse
Even if you are an expert wth Python, I highly recommend writing your first Elasticsearch client using the Eclipse IDE, which has a Python development plug-in that helps you not only step through your code but also see how Elasticsearch JSON is mapped to Python data structures. If you don’t have a Perl environment for Eclipse then follow the steps in this section to install one.
The PyDev project produces a plug-in for Eclipse that provides assistance for Python development. You can install the plug-in by following these steps.
- Select Help > Install New Software… from the Eclipse main menu.
- Click on Add button to add the Eclipse Perl Integration update site.
- Enter
PyDev and PyDev Extensionsin the name field.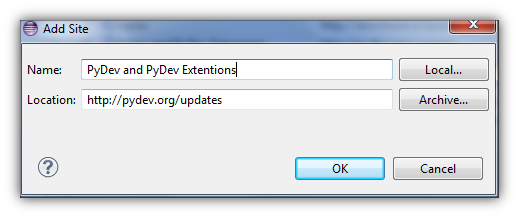
- Enter
hxxp://pydev.org/updates in the locationfield. - Click on OK.
- Click on the check box next to PyDev.
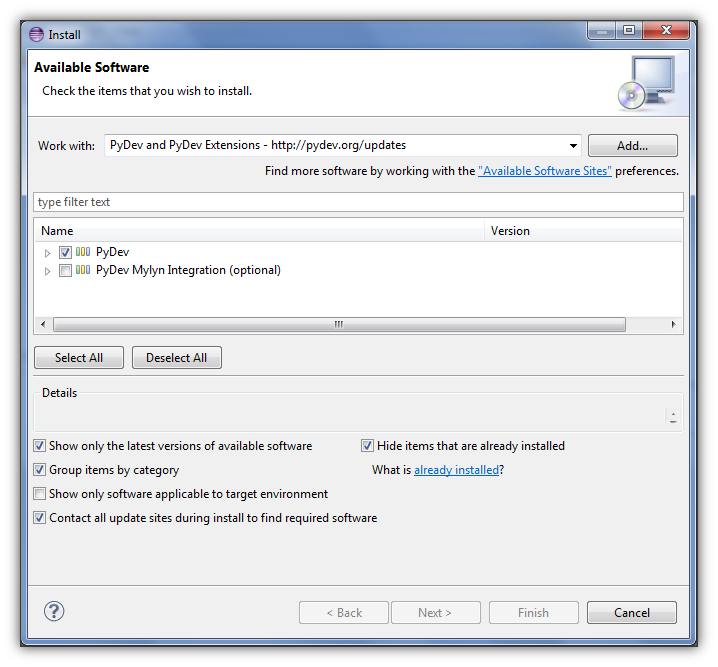
- Click on the Finish button. Note the button in this illustration is greyed out since I have already installed the PyDev plug-in on my system, but for first installations the
To add the Elasticsearch client library for Python on either Linux, Windows or Mac OS, simply run pip as follows:
pip install ElasticsearchConnecting to Elasticsearch
Let’s say we have an Elasticsearch cluster comprised of indices that contain data collected from Twitter’s 1% sample feed. The tweets are collected in a new index each day. The format of the index name is tweets-yyyy-mm-dd. The server nodes that are exposed to clients is 10.1.1.1 and 10.1.1.2 .
Now let’s do some programming. First create a new Perl project and client application file.
- Select File > New > Other…
- Enter the project name on the Select Wizard panel. Let’s call it
myPythonProject. - Select PyDev > PyDev Project
- Click on Finish.
- Right click on the Python project in the Navigation panel then select New > Other…
- Select General > File
- Enter the file name on the Select Wizard panel. Let’s call it
tweet_search.py. - Click on Finish.
- Double click on
tweet_search.pl, then start by entering the following code.
1
2
3
4
5
6
7
from elasticsearch import Elasticsearch
import sys
import logging

logging.basicConfig()

es = Elasticsearch(['10.1.1.1:9200','10.1.1.2:9200'])
Lines [1-5] Import the Elasticsearch client as well as the sys and logging modules.
Line [7] Create an Elasticsearch client object. Specify the IP addresses and default Elasticsearch ports of the nodes to which the client will attempt to connect.
Do an Elasticsearch Query
Tweets are structured in JSON format as specified in Twitter’s documentation. The fields that will be retrieved from Elasticsearch include the Twitter user ID string, the date the tweet was created and the expanded URL – after unshortening – that was sent in the text of the tweet. Let’s take a look how that data will appear in an index.
Here is a partial JSON structure that shows the placement of the tweet fields that will be included in each query response, namely the ID string of the user who sent the tweet, the date the tweet was created and the expanded URL that was sent in the text of the tweet.
"coordinates": {},
"created_at": "2014-05-24T03:42:22.000Z",
"entities": {
    "hashtags": [],
    "urls": [
        {
            "url": "hxxp://t.co/9Bt38zRSMr",
            "display_url": "Grd5.com",
            "expanded_url": "hxxp://Grd5.com"
        }
     ],
     "user_mentions": [
        {
            "id": 868880934,
            "name": "whatever",
            "screen_name": "galatk123456"
        }
     ]
},
"favorite_count": 0,
  ...
"user": {
    "contributors_enabled": false,
    "created_at": "2012-10-08T23:48:20.000Z",
    "description": "whatever",
    "favourites_count": 327,
    "followers_count": 167,
    "friends_count": 280,
    "id_str": "868880934",

  ...
Looking at this tweet snippet you can see that these fields are referenced by the JSON names as: user.id_str, created_at and entities.urls.expanded_url.
The query in this example will involve two indices, tweets-2014-04-12 and tweets-2014-04-13, looking for any expanded URL that comes from a Russian hosted domain *.ru. To do the Elasticsearch client search() method is called as follows:
1
2
3
4
5
6
7
8
9
10
11
rs = es.search(index=['tweets-2014-04-12','tweets-2014-04-13'],
               scroll='60s',
               search_type='scan',
               size=100,
               body={
                 "fields" : ["created_at", "entities.urls.expanded_url", "user.id_str"],
                   "query" : {
                     "wildcard" : { "entities.urls.expanded_url" : "*.ru" }
                   }
               }
           )
[Lines 1-4] One or more indices are specified in the index field which is an array of strings. The inclusion of the scroll and size fields creates what amounts to a cursor that indicates how many seconds Elasticsearch should cache results to be scrolled through and how many results are returned by each scroll operation, 100 tweets at a time in this case. Specifying search_type as scan disables sorting of search results to improve the efficiency of scrolling through result sets.
[Lines 5-10] The type of query and fields involved are specified in the body field. The fields array includes the tweet fields that we want in the query response. The query does a wildcard search for expanded URLs that contain the characters *.ru.
Retrieve the Query Results
The query results are retrieved 100 tweets at a time by successive calls to scroll() using the scroll ID returned from the original query.
1
2
3
4
5
6
7
8
9
10
tweets = []
scroll_size = rs['hits']['total']
while (scroll_size > 0):
    try:
        scroll_id = rs['_scroll_id']
        rs = es.scroll(scroll_id=scroll_id, scroll='60s')
        tweets += rs['hits']['hits']
        scroll_size = len(rs['hits']['hits'])
    except:
        break
[Lines 1-2] Create an array to hold all the retrieve tweets then retrieve successive sets of tweets in a while loop. Then set the scroll_size variable that will track the number of records returned during each scan loop. To start off scroll_size is set to the total number of documents that will be returned.
[Lines 3] While loop that gets the number of documents specified in the first search() call each time through. The while loop continues until scroll_size goes to 0.
[Lines 4-7] The scroll ID can change from scan to scan, so set the ID for subsequent scrolls to the one returned by the previous search() or scroll() call. Each time through the loop, the search results are returned in the rs['hits']['hits] array which is appended to the tweets array.
[Line 8] Update the scroll_size variable to the number of tweets returned. When the scanning is done, scroll() returns 0.
[Line 9-10] Catch any exceptions then break.
Display the Query Results
All that’s left to do is display the entire set of tweets returned. For queries where certain fields are specified, Elasticsearch conveniently returns just the fields specified, placing them in a JSON section labeled fields as shown here.
"hits": {
   "hits": [
      {
         "_index": "tweets-2014-04-12",
         "_type": "status",
         "_id": "470047633969782784",
         "_score": 1,
            "fields": {
               "user.id_str": [
                  "2481821394"
               ],
               "created_at": [
                  "2014-05-24T03:44:23.000Z"
               ],
               "entities.urls.expanded_url": [
                  "hxxp://www.zzzz.ru/top-ehnergetiki/2013-07-26-55"
               ]
            }
      },
...
To display the tweet fields, just loop through the tweets array referencing the returned fields as shown here.
for tweet in tweets:
    print tweet['_id'], tweet['fields']['user.id_str'],
    tweet['fields']['created_at'],
    tweet['fields']['entities.urls.expanded_url']
Using this client program you can experiment with other types of queries by simply changing the fields and body field contents.
my $rs = $es->search(
        index => ['tweets-2014-04-12','tweets-2014-04-13'],
        scroll => '60s',
        size => 100,
        search_type => 'scan',
        body => {
            'fields' => ['user.id_str','created_at','entities.urls.expanded_url'],
            'query' => {
                'wildcard' => {
                    'entities.urls.expanded_url' => '*.ru'
                }
            }
        }
    );
[Lines 1-5] One or more indices are specified in the index field which is an array of strings. The inclusion of the scroll and size field creates what amounts to a cursor that indicates how many seconds Elasticsearch should cache results to be scrolled through and how many results are returned by each scroll operation, 100 tweets at a time in this case. Specifying search_type as scan disables sorting of search results to improve the efficiency of scrolling through result sets.
[Lines 6-10] The type of query and fields involved are specified in the body field. The fields array includes the tweet fields that we want in the query response. The query does a wildcard search for expanded URLs that contain the characters .ru.
Display the Query Results
All that’s left to do is display the entire set of tweets returned. For queries where certain fields are specified, Elasticsearch conveniently returns just the fields specified, placing them in a JSON section labeled fields as shown here.
for tweet in tweets:
    print tweet['_id'], tweet['fields']['user.id_str'],
    tweet['fields']['created_at'],
    tweet['fields']['entities.urls.expanded_url']
Using this client program you can experiment with other types of queries by simply changing the fields and body field contents.


Leave a comment